With chatbots being all the rage now, let’s explore a step-by-step guide on how to make a Telegram bot in Python. The bot should be able to show the exchange rates, show the difference between the past and the current exchange rates, as well as use modern inline keyboards.
Table of contents:
- Step 0: Telegram Bot API theory
- Step 1: Implement the exchange rates requests
- Step 2: Create a Telegram bot using @BotFather
- Step 3: Configure and initialize the bot
- Step 4: Write the /start command handler
- Step 5: Create the /help command handler
- Step 6: Add the /exchange command handler
- Step 7: Write an inline button click handler
- Step 8: Implement the update button handler
- Step 9: Implement the inline mode

Step #0: A little bit of Telegram Bot API theory
Here’s a a simple question to start our guide: how do you develop Telegram chatbots?
The answer is very easy: you use HTTP API both for reading the messages sent by users and for messaging back. This calls for using URL which looks like:
https://api.telegram.org/bot/METHOD_NAME
A token is a unique string of characters required to authenticate a bot in the system. It is generated during the bot’s creation and looks like this:
123456:ABC-DEF1234ghIkl-zyx57W2v1u123ew11
METHOD_NAME (and this is obvious from its name) is a method, for example, getUpdates, sendMessage, getChat, etc.
To executie requests, you can use both GET and POST requests. A lot of methods require additional parameters (while using the sendMessage method, for example, it’s necessary to state chat_id and text). The parameters can be passed as a URL query string, application/x-www-form-urlencoded, and application-json (except for uploading of files).
Another requirement is UTF-8 encoding.
After sending an API request you will receive a JSON response. For example, if we fetch data with “getMe” method, we’ll receive something like this:
GET https://api.telegram.org/bot<token>/getMe
{
   ok: true,
   result: {
       id: 231757398,
       first_name: "Exchange Rate Bot",
       username: "exchangetestbot"
   }
}
If ‘ok’ is true, the request was successful and the result will be displayed in the ‘result’ field. If ‘ok’ is false, you will see an error message in the ‘description’ field.
You can find a list of all Telegram Bot API data types and methods here.
The next question: how to receive the users’ messages?
There are two ways to do this.
You can manually make requests via the getUpdates method. In the response, you will get an array of Update objects. This method acts as long polling technology (you make a request, process the data and then start over again). To avoid reprocessing the same data, it’s recommended to use the offset parameter.
The second way is to use webhooks. You have to use the setWebhook method only once. After that, Telegram will send all the updates on the specified URL as soon as they arrive.
The only limitation is that you need HTTPS (however, self-signed certificates are also permitted).
But how do you choose an optimal method for receiving messages?
The getUpdates method is best suited if:
- You don’t want or can’t configure HTTPS during the development.
- You use scripting languages operation which is hard to integrate into a web server.
- Your bot is high-loaded.
- You change the bot’s server from time to time.
The webhook method is the best choice if:
- You code in a web language (e.g. PHP).
- Your bot is low-load and there is no point in manually requesting updates on a regular basis.
- Your bot is permanently integrated into a web server.
In this guide, I will use the getUpdates method.
Now, how to make a bot program?
@BotFather is used to create Telegram bots. It also allows a basic configuration (description, profile photo, inline support, etc.).
There are plenty of libraries that can simplify working with Telegram Bot API. To name a few:
- Python
pyTelegramBotAPI (TeleBot)
Telepot - PHP
Telegram Bot API – PHP SDK + Laravel Integration - Java
TelegramBots - NodeJS
Telegram Node Bot - Ruby
Telegram Bot - C#
Telegram Bot API Library
At their core, all these libraries are HTTP requests wrappers. A great deal of them is written using OOP and reflects all the Telegram Bot API data types in classes.
In this Telegram bot tutorial, I’m going to create a Python chatbot with the help of pyTelegramBotApi library.
Read more: how to develop an API: a comprehensive guide.
Step #1: Implement the exchange rates requests
Let’s write a Python script which is going to implement the logic for specific currency exchange rates requests. We’re going to use PrivatBank API.
An example of a response:
[
    {
        ccy: "EUR",
        base_ccy: "UAH",
        buy: "28.70000",
        sale: "29.10000"
    },
    {
        ccy: "RUR",
        base_ccy: "UAH",
        buy: "0.39300",
        sale: "0.40300"
    },
    {
        ccy: "USD",
        base_ccy: "UAH",
        buy: "25.40000",
        sale: "25.70000"
    }
]
Let’s create a pb.ру file and write the following code:
# -*- coding: utf-8 -*-
import re
import requests
import json<br>
URL = 'https://api.privatbank.ua/p24api/pubinfo?json&exchange&coursid=5'
<br>def load_exchange():
   return json.loads(requests.get(URL).text)

def get_exchange(ccy_key):
   for exc in load_exchange():
       if ccy_key == exc['ccy']:
           return exc
   return False

def get_exchanges(ccy_pattern):
   result = []
   ccy_pattern = re.escape(ccy_pattern) + '.*'
   for exc in load_exchange():
       if re.match(ccy_pattern, exc['ccy'], re.IGNORECASE) is not None:
           result.append(exc)
   return result
We have implemented three methods:
- load_exchange: loads the exchange rates on a specified URL and returns in dict type.
- get_exchange: returns the exchange rates for the requested currency.
- get_exchanges: returns a list of currencies according to a pattern (required in search for currencies in inline requests).
Step #2: Create a Telegram bot using @BotFather
Contact the @BotFather bot to receive a list of Telegram chat commands.
Now use the /newbot command and wait for instructions to select a name and username. Upon successfully creating your bot, you’ll receive the following message:
Done! Congratulations on your new bot. You will find it at telegram.me/<username>.
You can now add a description, about section and profile picture for your bot, see /help for a list of commands.
By the way, when you've finished creating your cool bot, ping our Bot Support if you want a better username for it.
Just make sure the bot is fully operational before you do this.

Use this token to access the HTTP API:
<token> (here goes the bot’s token)

For a description of the Bot API, see this page: https://core.telegram.org/bots/api
Let’s configure the bot’s settings. Specify description and about text (/setdescription and /setabouttext commands), profile photo (/setuserpic), turn on inline mode (/setinline), add commands prompts (/setcommands).
You will need to use two commands: /help and /exchange. Let’s describe them in /setcommands.
Now when the setup is over, you can proceed to writing the code. Before moving on, I would highly recommend reading about the API and looking into the library documentation to better understand the information below.
Step #3: Configure and initialize the bot
Let’s begin with creating a config.py file for configuration purposes:
# -*- coding: utf-8 -*-
TOKEN = '<bot token>’'
TIMEZONE = 'Europe/Kiev'
TIMEZONE_COMMON_NAME = 'Kiev'
Here we have: the bot’s token and the time zone it will operate in (you’ll need this in the future to specify the time for message updating. Telegram API doesn’t allow you to find out a user’s time zone, therefore the update time should be displayed with a time zone prompt).
Let’s create a bot.py file, import all the necessary libraries, config files and the previously created pb.py. If some of the libraries are absent, install them via pip.
# -*- coding: utf-8 -*-
import telebot
import config
import pb
import datetime
import pytz
import json
import traceback

P_TIMEZONE = pytz.timezone(config.TIMEZONE)
TIMEZONE_COMMON_NAME = config.TIMEZONE_COMMON_NAME
Let’s create the bot using the pyTelegramBotAPI library. For this purpose, you should pass the token into a constructor:
bot = telebot.TeleBot(config.TOKEN)
bot.polling(none_stop=True)
Step #4: Write the /start command handler
Now your Python chat bot is initialized and constantly requests the getUpdates method. The none_stop parameter is responsible for polling to continue even if the API returns an error while executing the method.
Then it’s possible to call any Telegram Bot API methods from a bot variable.
Let’s start with writing a /start command handler and add it before the bot.polling(none_stop=True) line:
@bot.message_handler(commands=['start'])
def start_command(message):
   bot.send_message(
       message.chat.id,
       'Greetings! I can show you PrivatBank exchange rates.\n' +
       'To get the exchange rates press /exchange.\n' +
       'To get help press /help.'
   )
As you can see, pyTelegramBotApi uses Python decorators to initialize handlers for various Telegram commands. You can also catch messages using regexp, their content-type and with lambda functions.
In our case, if commands=[‘start’] condition is true, the start_command function will be called. A message object (deserialized Message type) will be passed into this function. Afterward, you simply execute send_message into the same chat with the specified message.
Whew, that was easy, wasn’t it?
Step #5: Create the /help command handler
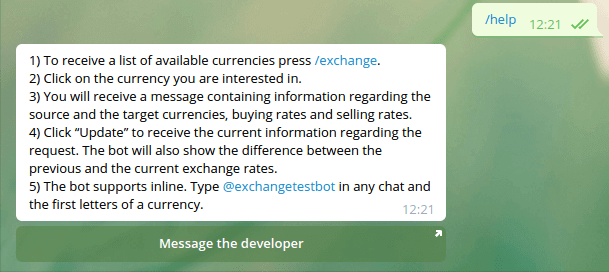
Let’s spice up our /help command handler with an inline button linking to your Telegram account. Let’s name the button “Message the developer”.
@bot.message_handler(commands=['help'])
def help_command(message):
   keyboard = telebot.types.InlineKeyboardMarkup()
   keyboard.add(
       telebot.types.InlineKeyboardButton(
           ‘Message the developer’, url='telegram.me/artiomtb'
       )
   )
   bot.send_message(
       message.chat.id,
       '1) To receive a list of available currencies press /exchange.\n' +
       '2) Click on the currency you are interested in.\n' +
       '3) You will receive a message containing information regarding the source and the target currencies, ' +
       'buying rates and selling rates.\n' +
       '4) Click “Update” to receive the current information regarding the request. ' +
       'The bot will also show the difference between the previous and the current exchange rates.\n' +
       '5) The bot supports inline. Type @<botusername> in any chat and the first letters of a currency.',
       reply_markup=keyboard
   )
As you can see in the example above, I’ve used an additional parameter (reply_markup) for the send_message method. The method received InlineKeyboardMarkup consisting of a single InlineKeyboardButton with the text: “Message the developer” and url=’telegram.me/artiomtb’.
The above looks like this:
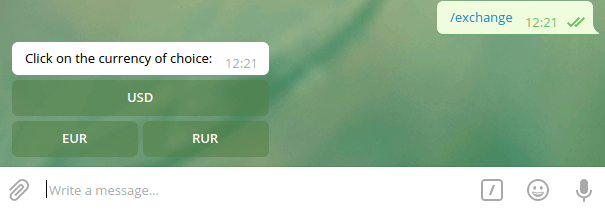
Step #6: Add the /exchange command handler
The /exchange command handler displays a currency choice menu and inline bot keyboard consisting of 3 buttons: USD, EUR, and RUR (these are the currencies supported by the banking API).
@bot.message_handler(commands=['exchange'])
def exchange_command(message):<br>  keyboard = telebot.types.InlineKeyboardMarkup()
  keyboard.row(
      telebot.types.InlineKeyboardButton('USD', callback_data='get-USD')
  )
  keyboard.row(
    telebot.types.InlineKeyboardButton('EUR', callback_data='get-EUR'),
    telebot.types.InlineKeyboardButton('RUR', callback_data='get-RUR')
  )

  bot.send_message(message.chat.id, ‘Click on the currency of choice:', reply_markup=keyboard)
Let me explain what callback-data in InlineKeyboardButton is. When a user clicks this button you’ll receive CallbackQuery (its data parameter will contain callback-data) in getUpdates. In such a way, you will know exactly which button a user has pressed and handle it as appropriate.
BTW, this is how the /exchange response looks like:
Step #7: Write an inline button click handler
pyTelegramBotAPI offers using the @bot.callback_query_handler decorator which will pass the CallbackQuery object into a nested function.
@bot.callback_query_handler(func=lambda call: True)
def iq_callback(query):
   data = query.data
   if data.startswith('get-'):
       get_ex_callback(query)
Let’s implement the get_ex_callback method:
def get_ex_callback(query):
   bot.answer_callback_query(query.id)
   send_exchange_result(query.message, query.data[4:])
The answer_callback_query method is required to remove the loading state, which appears upon clicking the button. Let’s send a message into send_exchange_query. You’ll have to pass it the Message and the currency code (you can get it from query.data. If it was, for example, get-USD, then pass USD).
Let’s implement send_exchange_result:
def send_exchange_result(message, ex_code):
   bot.send_chat_action(message.chat.id, 'typing')
   ex = pb.get_exchange(ex_code)
   bot.send_message(
       message.chat.id, serialize_ex(ex),
       reply_markup=get_update_keyboard(ex),
       parse_mode='HTML'
   )
This is also pretty straightforward.
Let’s first send the typing state into the chat, so that the bot will display the “typing” indicator while the banking API receives a request. Now let’s call the get_exchange method from a pb.py file, which will receive the currency code (e.g. USD). You’ll also have to call two new methods into send_message: serialize_ex, a currency serializer, and get_update_keyboard (which returns the keyboard to “Update” and “Share” buttons).
def get_update_keyboard(ex):
   keyboard = telebot.types.InlineKeyboardMarkup()
   keyboard.row(
       telebot.types.InlineKeyboardButton(
           'Update',
           callback_data=json.dumps({
               't': 'u',
               'e': {
                   'b': ex['buy'],
                   's': ex['sale'],
                   'c': ex['ccy']
               }
           }).replace(' ', '')
       ),
       telebot.types.InlineKeyboardButton('Share', switch_inline_query=ex['ccy'])
   )
   return keyboard
Let’s write in get_update_keyboard the current exchange rates in callback_data using JSON format. JSON is intentionally compressed because the maximum allowed file size is 64 bytes.
t key means type and e key means exchange. The rest is done using the same principle.
The “Share” button will have the switch_inline_query parameter. Pressing the button will prompt the user to select one of their chats, open that chat and insert the bot‘s username and the specified inline query in the input field.
Next, let’s present the serialize_ex method and auxiliary serialize_exchange_diff required to show the difference between the current and the old exchange rates upon clicking the “Update” button.
def serialize_ex(ex_json, diff=None):
result = '<b>' + ex_json['base_ccy'] + ' -> ' + ex_json['ccy'] + ':</b>\n\n' + \
'Buy: ' + ex_json['buy']
if diff:
result += ' ' + serialize_exchange_diff(diff['buy_diff']) + '\n' + \
'Sell: ' + ex_json['sale'] + \
' ' + serialize_exchange_diff(diff['sale_diff']) + '\n'
else:
result += '\nSell: ' + ex_json['sale'] + '\n'
return result
def serialize_exchange_diff(diff):
result = ''
if diff > 0:
result = '(' + str(diff) + ' <img draggable="false" data-mce-resize="false" data-mce-placeholder="1" data-wp-emoji="1" class="emoji" alt="<img draggable="false" data-mce-resize="false" data-mce-placeholder="1" data-wp-emoji="1" class="emoji" alt="<img draggable="false" data-mce-resize="false" data-mce-placeholder="1" data-wp-emoji="1" class="emoji" alt="<img draggable="false" data-mce-resize="false" data-mce-placeholder="1" data-wp-emoji="1" class="emoji" alt="<img draggable="false" data-mce-resize="false" data-mce-placeholder="1" data-wp-emoji="1" class="emoji" alt="↗️" src="https://s.w.org/images/core/emoji/2.3/svg/2197.svg">" src="https://s.w.org/images/core/emoji/2.3/svg/2197.svg">" src="https://s.w.org/images/core/emoji/2.3/svg/2197.svg">" src="https://s.w.org/images/core/emoji/72x72/2197.png">" src="https://s.w.org/images/core/emoji/72x72/2197.png">)'
elif diff < 0:
result = '(' + str(diff)[1:] + ' <img draggable="false" data-mce-resize="false" data-mce-placeholder="1" data-wp-emoji="1" class="emoji" alt="<img draggable="false" data-mce-resize="false" data-mce-placeholder="1" data-wp-emoji="1" class="emoji" alt="<img draggable="false" data-mce-resize="false" data-mce-placeholder="1" data-wp-emoji="1" class="emoji" alt="<img draggable="false" data-mce-resize="false" data-mce-placeholder="1" data-wp-emoji="1" class="emoji" alt="<img draggable="false" data-mce-resize="false" data-mce-placeholder="1" data-wp-emoji="1" class="emoji" alt="↘️" src="https://s.w.org/images/core/emoji/2.3/svg/2198.svg">" src="https://s.w.org/images/core/emoji/2.3/svg/2198.svg">" src="https://s.w.org/images/core/emoji/2.3/svg/2198.svg">" src="https://s.w.org/images/core/emoji/72x72/2198.png">" src="https://s.w.org/images/core/emoji/72x72/2198.png">)'
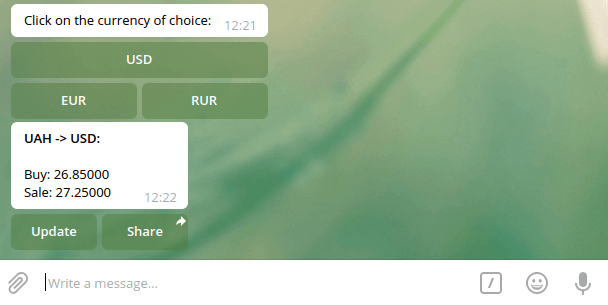
return resultAs you can see, the serialize_ex method receives an optional parameter diff. It’s there that you’ll pass the difference between the exchange rates in {‘buy_diff’: <float>, ‘sale_diff’: <float>} format. This will happen during the serialization when you click the “Update” button. We won’t need it the first time the exchange rates are displayed on the screen.
This is how the bot’s answer looks like upon clicking USD button:
Step # 8: Implement the update button handler
Now you’re ready to implement the “Update” button handler. After complementing the iq_callback method it will look as follows:
@bot.callback_query_handler(func=lambda call: True)
def iq_callback(query):
   data = query.data
   if data.startswith('get-'):
       get_ex_callback(query)
   else:
       try:
           if json.loads(data)['t'] == 'u':
               edit_message_callback(query)
       except ValueError:
           pass
If callback-data begins with get-’ (get-USD, get-EUR and so on) then let’s call get_ex_callback as we did before. Otherwise let’s try to parse JSON and receive its t key. If it equals ‘u’ then call the edit_message_callback method. Let’s implement it:
def edit_message_callback(query):
   data = json.loads(query.data)['e']
   exchange_now = pb.get_exchange(data['c'])
   text = serialize_ex(
       exchange_now,
       get_exchange_diff(
           get_ex_from_iq_data(data),
           exchange_now
       )
   ) + '\n' + get_edited_signature()
   if query.message:
       bot.edit_message_text(
           text,
           query.message.chat.id,
           query.message.message_id,
           reply_markup=get_update_keyboard(exchange_now),
           parse_mode='HTML'
       )
   elif query.inline_message_id:
       bot.edit_message_text(
           text,
           inline_message_id=query.inline_message_id,
           reply_markup=get_update_keyboard(exchange_now),
           parse_mode='HTML'
       )
How does it work?
- Load the current exchange rate (exchange_now = pb.get_exchange(data[‘c’]).
- Generate a text for a new message by serializing the current exchange rate with the diff parameter, which you’ll receive with the aid of new methods (I’ll write about them below). Let’s also add an edit signature – get_edited_signature.
- Call the edit_message_text method if the original message is regular. If it’s a response to an inline request, pass different parameters.
The get_ex_from_iq_data method parses JSON from callback_data:
def get_ex_from_iq_data(exc_json):
   return {
       'buy': exc_json['b'],
       'sale': exc_json['s']
   }
The get_exchange_diff method receives the old and the current exchange rates and returns the difference in {‘buy_diff’: <float>, ‘sale_diff’: <float>} format:
def get_exchange_diff(last, now):
   return {
       'sale_diff': float("%.6f" % (float(now['sale']) - float(last['sale']))),
       'buy_diff': float("%.6f" % (float(now['buy']) - float(last['buy'])))
   }
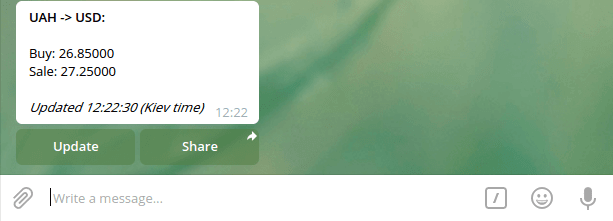
get_edited_signature generates “updated …” text:
def get_edited_signature():
return '<i>Updated ' + \
str(datetime.datetime.now(P_TIMEZONE).strftime('%H:%M:%S')) + \
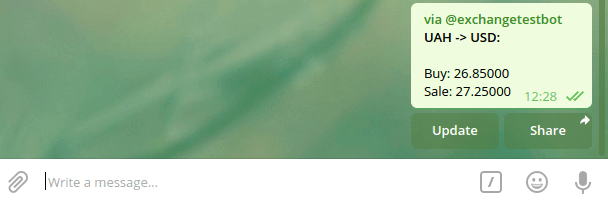
' (' + TIMEZONE_COMMON_NAME + ')</i>'This is how the message looks like upon updating if the exchange rates haven’t changed:
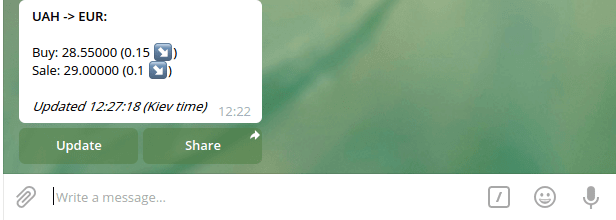
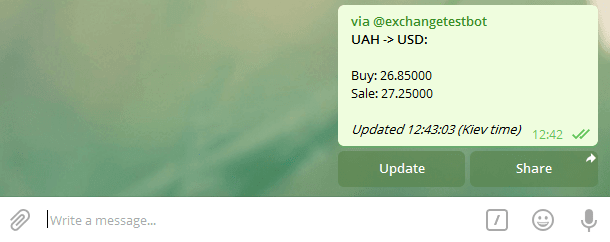
And this is how it looks when the exchange rates have changed:
Step #9: Implement the inline mode
Implementing inline means that writing @ + bot’s name in any chat will activate the search for the entered text and offer the results. By clicking one of them the bot will send the result on your behalf (marked “via bot”).
@bot.inline_handler(func=lambda query: True)
def query_text(inline_query):
   bot.answer_inline_query(
       inline_query.id,
       get_iq_articles(pb.get_exchanges(inline_query.query))
   )
Voila, you have implemented the inline query handler.
The library will pass the InlineQuery object into the query_text function. Inside you use the answer_inline_query function which should receive inline_query_id and an array of objects (the search results).
Let’s use get_exchanges from pb.py to search for several currencies that suit the search query. Let’s pass this array into the get_iq_articles method which will return the array from InlineQueryResultArticle:
def get_iq_articles(exchanges):
   result = []
   for exc in exchanges:
       result.append(
           telebot.types.InlineQueryResultArticle(
               id=exc['ccy'],
               title=exc['ccy'],
               input_message_content=telebot.types.InputTextMessageContent(
                   serialize_ex(exc),
                   parse_mode='HTML'
               ),
               reply_markup=get_update_keyboard(exc),
               description='Convert ' + exc['base_ccy'] + ' -> ' + exc['ccy'],
               thumb_height=1
           )
       )
   return result
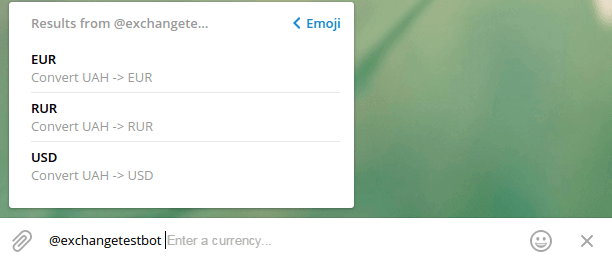
Now when you enter @exchnagetestbot + space in any chat you’ll see the following:
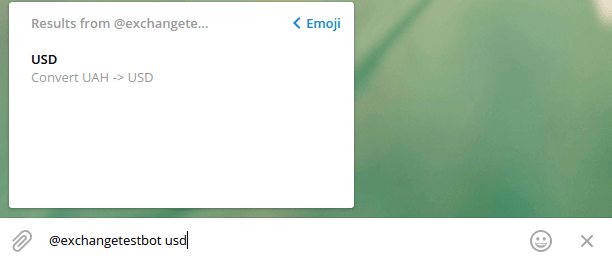
Let’s type usd and the result will be instantly filtered:
Let’s click the offered result:
The “Update” button is also operational:
Good job! You’ve successfully implemented the inline mode!
Wrapping up
Congratulations! Now you know how to make a Python chatbot for Telegram, implement inline keyboard, messages updating, and the inline mode. You can pat yourself on your awesome back and raise a toast to the new Botfather.
Hit the subscribe button below to get more tech news or message us directly if you need some help with your business bot.
References:
- https://core.telegram.org/bots
- https://core.telegram.org/bots/api
- https://github.com/eternnoir/pyTelegramBotAPI
More on chatbots: