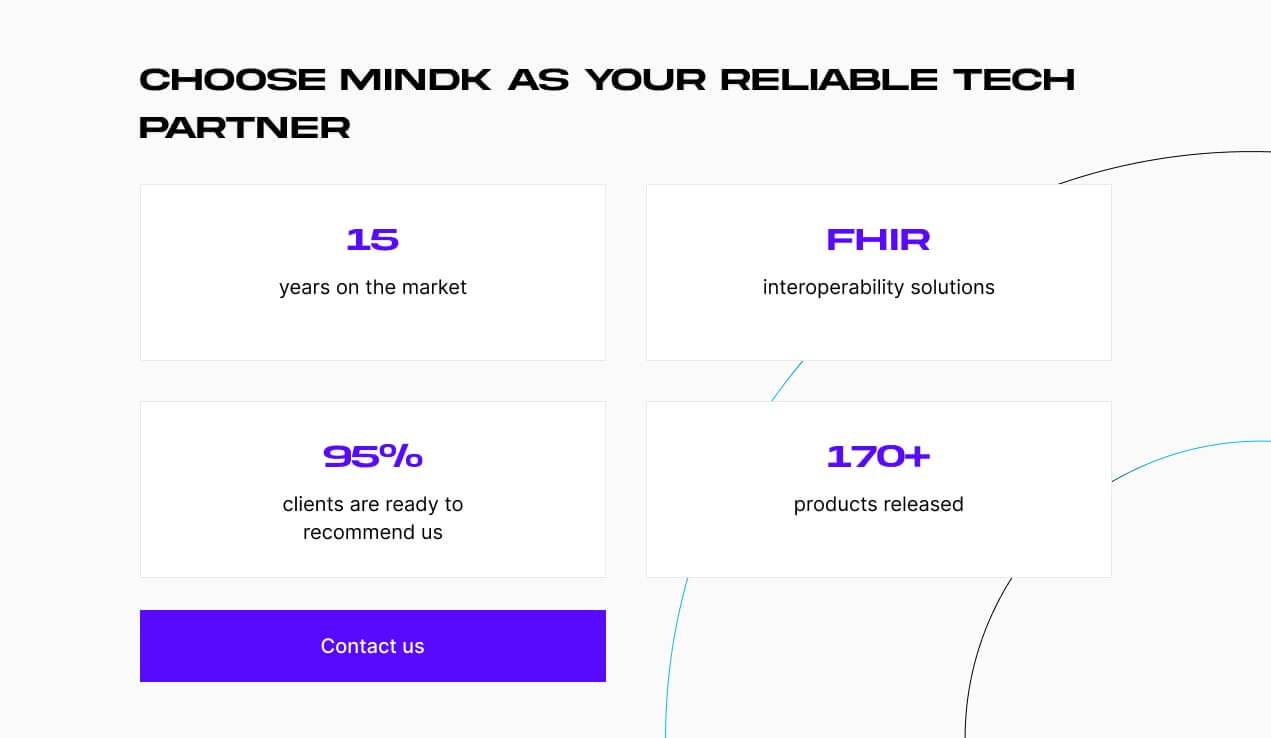
Less than two years remain for healthcare payors to fully comply with CMS-0057-F (CMS Interoperability and Prior Authorization Final Rule). Impressive title aside, this requires the development or improvement of Patient Access APIs. This guide covers everything you need to know about the topic.
Patient access APIs are relatively simple for teams with cloud-native expertise. The tricky part is mapping the data from all the legacy systems to appropriate FHIR resources, creating the logic for the FHIR transformation, and synchronizing the data properly across the systems.
This guide will cover these challenges in greater detail, so that you can avoid costly reworks.
Table of contents:
- #1 Understand what the Patient Access API is all about
- #2 Choose an optimal approach to compliance
- #3 Identify the data for correct FHIR mapping
- #4 Normalize the data to prevent any distortions
- #5 Synchronize the data to avert instability
- #6 Set up authorization, authentication, and consents
- #7 Make your error handling patient-centric
- #8 Test and validate the Patient Access API
- #9 Expose the FHIR API endpoints securely
- #10 Implement monitoring and observability
- #11 Publish interactive docs for developers
- #12 Maintain the API usability and compliance
#1 Understand what the Patient Access API is all about
As covered in our CMS-0057-F guide, healthcare payors must provide patients with secure access to health data, including:
- Claims, adjudicated claims, and encounters.
- Lab results, medications, shots, and other clinical data.
- Provider directory information.
- Formularies and drug coverage information.
- Prior authorization statuses and details.
Patient Access API is the standard way to provide this data.
Who needs a Patient Access API?
- Medicare Advantage (MA) organizations.
- State Medicaid fee-for-service (FFS) programs.
- Medicaid managed care plans.
- State CHIP FFS programs and CHIP managed care entities.
- Qualified Health Plan (QHP) issuers on the Federally-Facilitated Exchanges (FFEs).
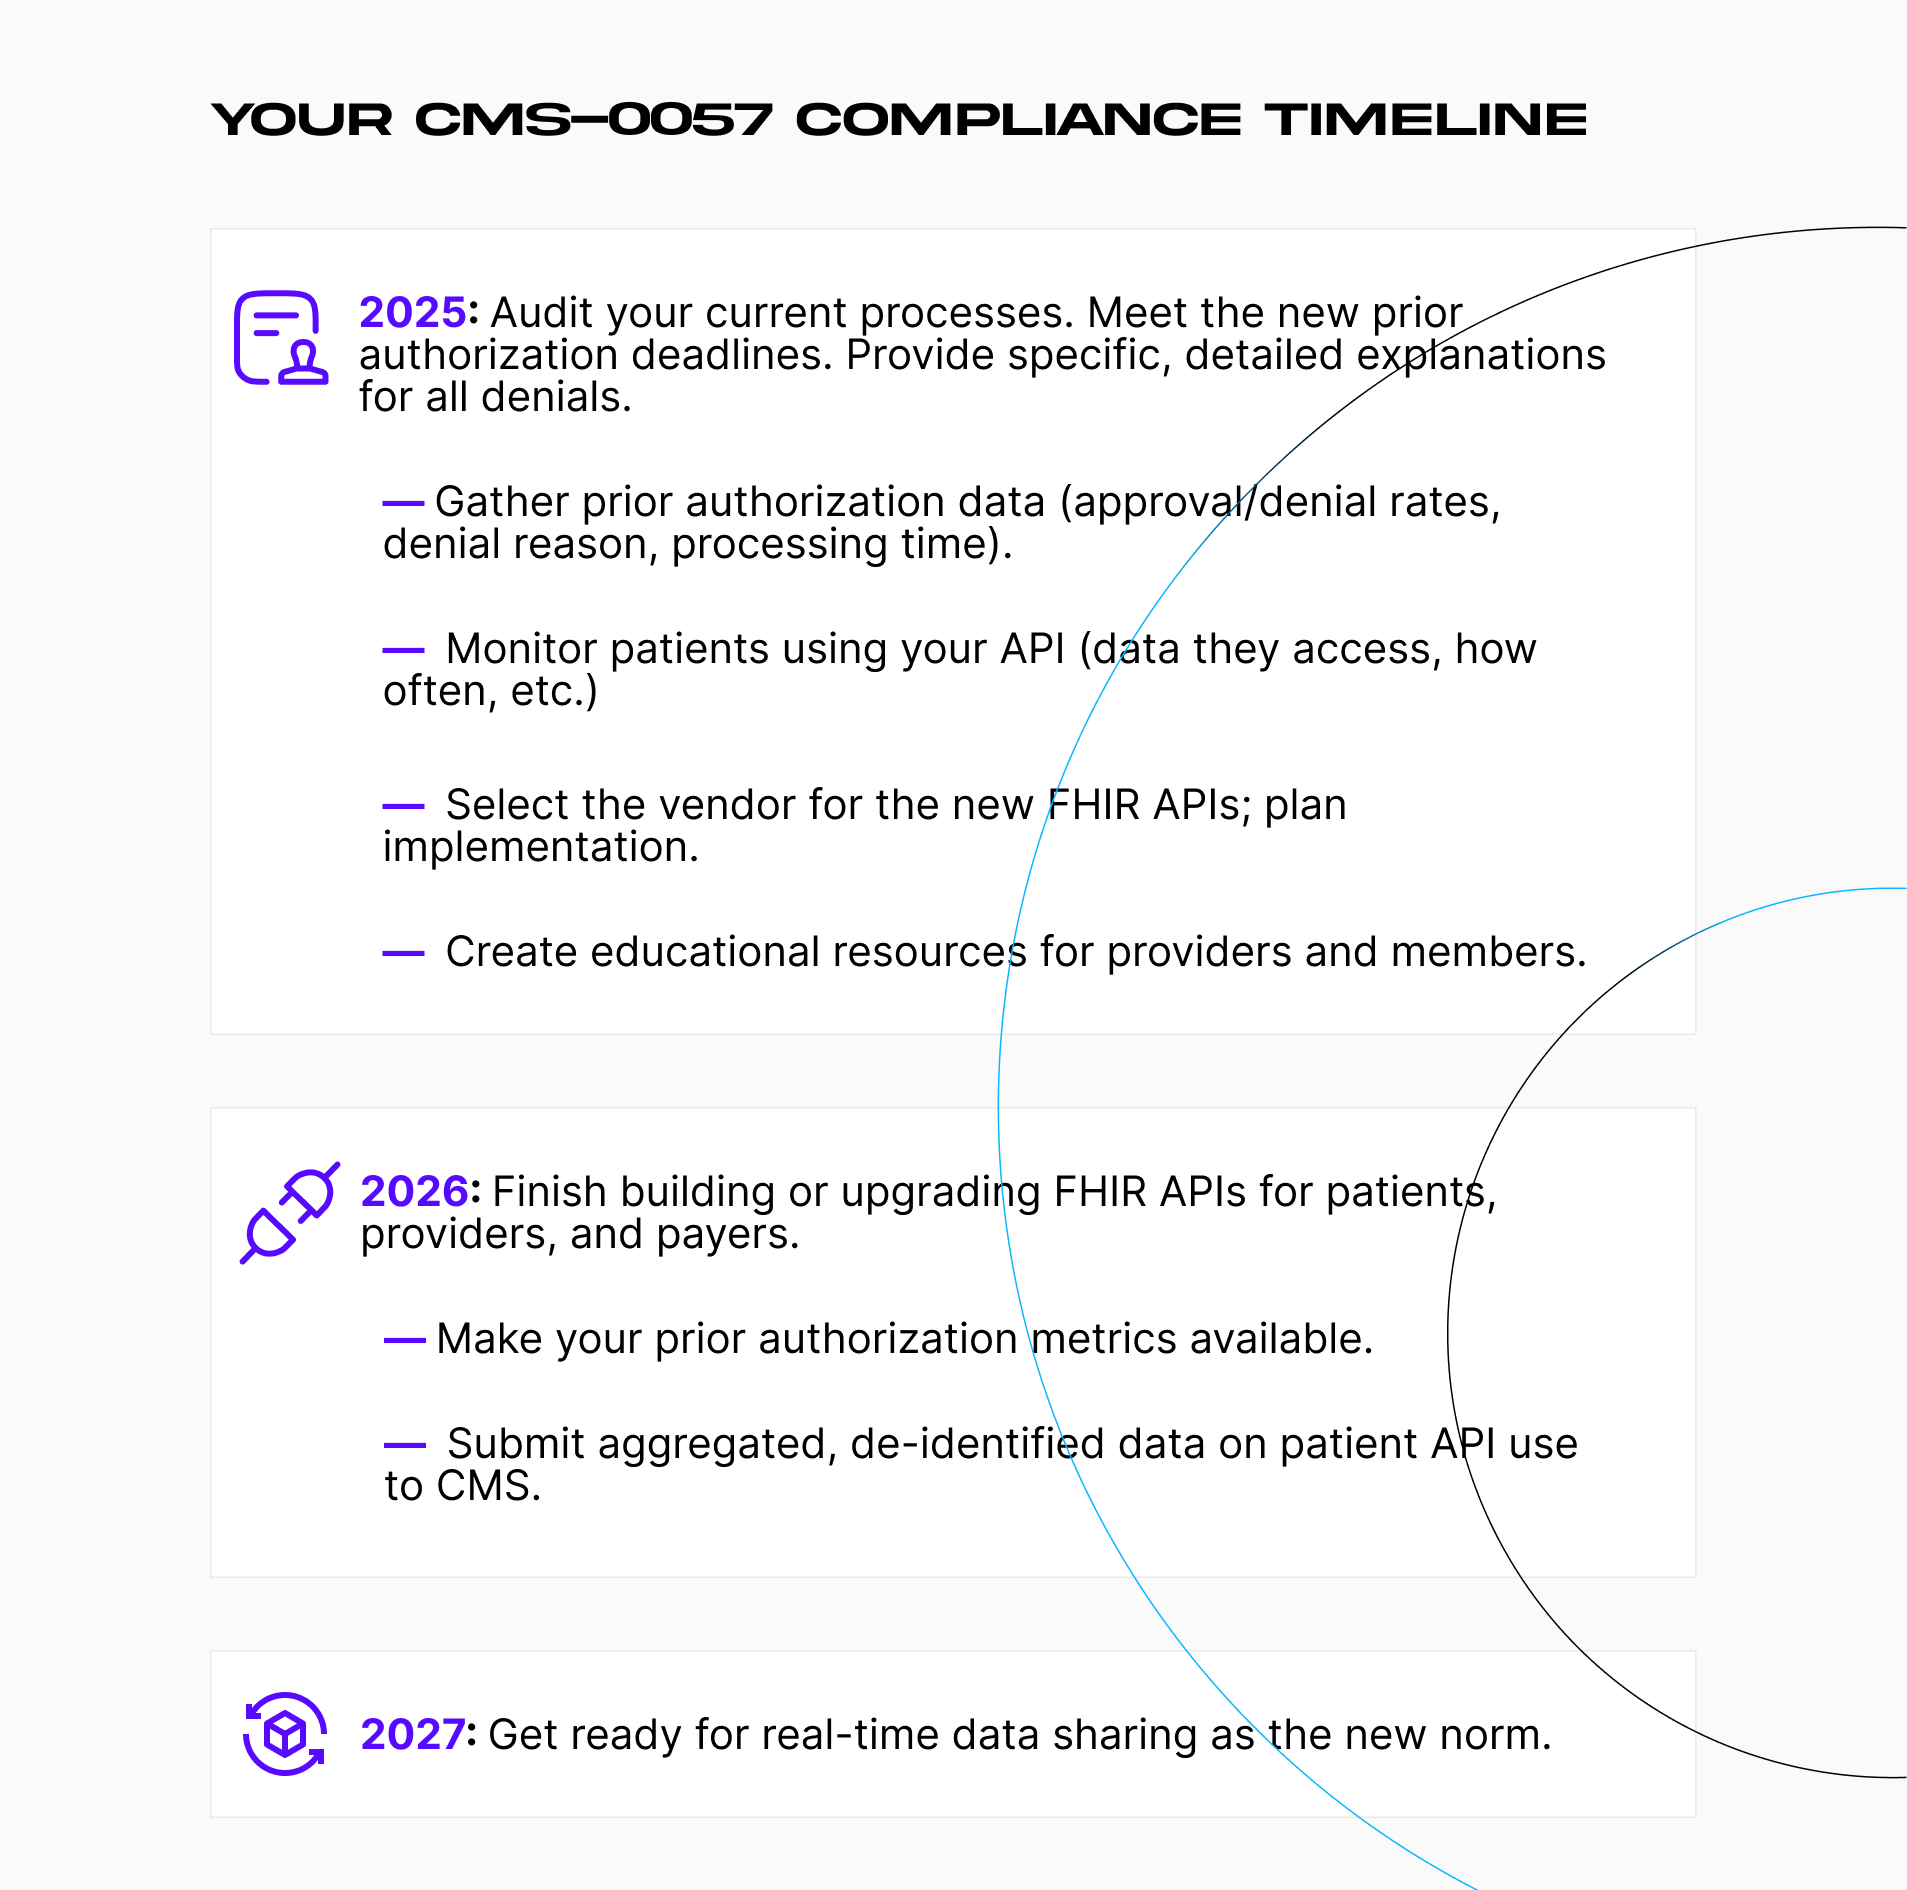
What are the deadlines?
- January 1, 2026. The affected organizations must report Patient Access API usage metrics to CMS.
- January 1, 2027. Provide patients with prior authorization information using the API within 1 business day of the decision.
Now, how do you implement a FHIR-compliant Patient Access API?
#2 Choose an optimal approach to compliance
There are several options for implementing a Patient Access API.
The most popular approach is using a plug-and-play solution like Azure Health Data Services. It is a fully-managed, secure, and scalable FHIR service that:
- Acts as the Patient Access API and FHIR data store.
- Supports FHIR R4.0.1+ and SMART on FHIR out of the box.
- Provides built-in OAuth 2.0 / OpenID Connect integration.
- Enforces access control and auditability.
- Integrates with Azure-native tools for monitoring, compliance, and data ingestion.
The API itself supports custom extensions, token validation, and audit capture, making it suitable as the access layer for third-party apps. It is a fast and cost-effective way to meet CMS requirements for healthcare startups. However, it sacrifices some of the flexibility required by larger organizations.
Another option is to use Azure as a stateless frontend, while the data stays in your internal systems. The API requests go through an internal microservice layer that gathers and transforms the data. This approach is more complex but offers rich customization, tight data governance, and minimal duplication.
The last alternative is a custom pipeline that extracts data from internal systems, transforms it into FHIR resources, and loads it into a separate data store. This makes it easier for large enterprises to control data quality and compliance.
This guide will follow the first approach, using Azure Health Data Services as a cloud-native FHIR Patient Access API and data store. With that out of the way, let’s define our scope.
#3 Identify the data for correct FHIR mapping
It’s crucial to establish what patient information your API will expose:
- Clinical data (conditions, medications, procedures, observations).
- Claims, coverage, and explanation of benefits (EOB).
- Provider directories and formulary data.
This requires mapping data in existing systems to appropriate FHIR resources (like ExplanationOfBenefit, Procedure, or Condition).
The complexity of this step is often underestimated. Legacy data vary in structures, terminology, and interpretations across clinical, billing, and administrative datasets. The team might have to iterate several times to reveal conflicting definitions or incomplete data in legacy systems.
To make things easier, we identify the data sources that need mapping and exposure:
- Electronic Health Records (EHR).
- Claims processing systems.
- Eligibility and coverage databases.
- Provider directories.
It’s best to start with data explicitly required by CMS-0057-F. Limiting this initial scope reduces the initial complexity. Common mappings for Patient Access API include:
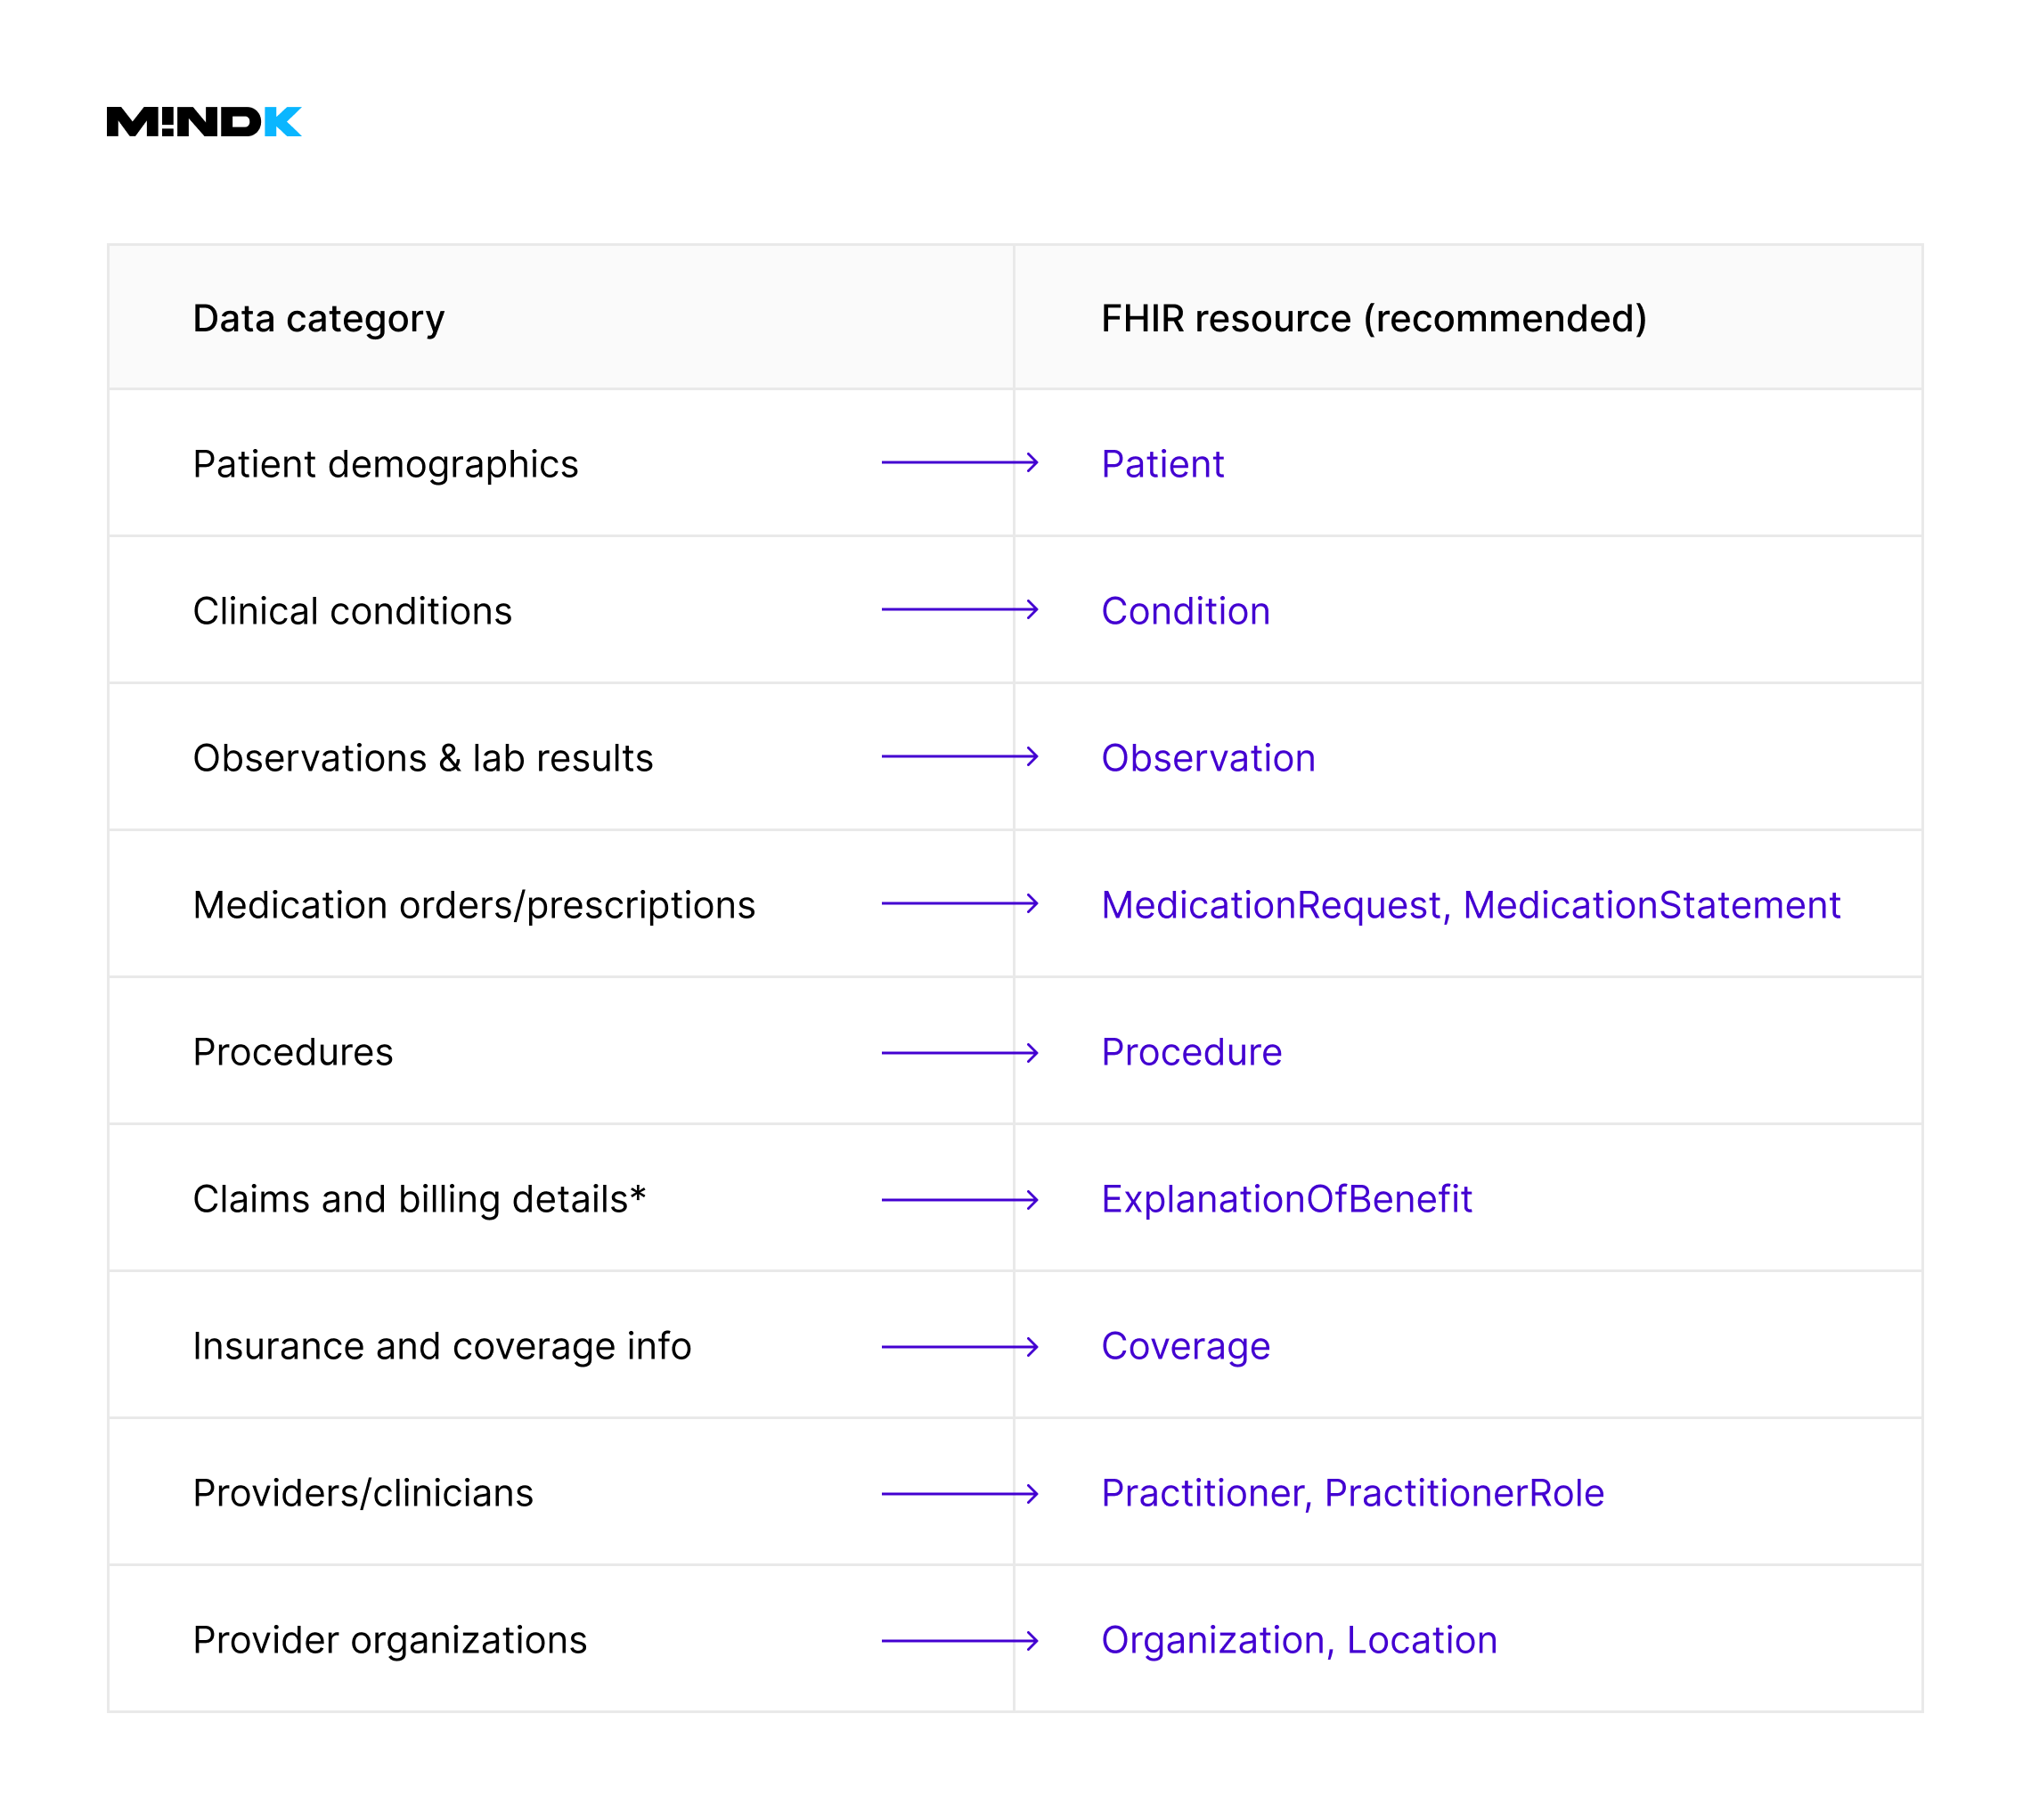
*It’s important to use the ExplanationOfBenefit resource rather than Claim to represent processed claims. The latter is primarily intended for claim submissions, not finalized payment or adjudication records.
MindK recommends a structured workflow to map the data:
- Export realistic examples from each data source.
- Map each source data field explicitly to a specific FHIR resource and field.
- Validate mappings with subject matter experts to avoid costly mapping errors later.
- Document mappings source-to-target relations, and transformation rules.
Here’s how such a mapping documentation might look like on a real project.
| Source System | Source Table | Source Field | FHIR Resource | FHIR Field | Notes |
| EHR System | PAT_INFO | patient_id | Patient | identifier.value | Unique patient identifier |
| Claims DB | CLAIMS | claim_amount | ExplanationOfBenefit | total.amount.value | Final adjudicated amount |
| Pharmacy DB | RX | medication_code | MedicationRequest | medicationCodeableConcept | RxNorm codes preferred |
This stage includes a few challenges and common pitfalls. Different systems use varying codes (e.g., local medication codes instead of RxNorm). Clinical data is often ambiguous or inconsistent.
A Business Analyst must confirm the clinical meaning and the correct corresponding FHIR resources. For instance, deciding between Observation and Condition often requires clinical judgment.
The data might also be incomplete, lacking key fields required by FHIR standards. This means that we need to define clear default behaviors or handling rules. For example, use DataAbsentReason extensions in FHIR to explicitly document why particular data elements are unavailable.
The step is complete once all the required CMS-0057-F data points are explicitly mapped, consistent in terminology, and validated by clinical professionals. Next, we create the logic for the FHIR transformation.
#4 Normalize the data to prevent any distortions
After clearly mapping your data, the next critical step is normalizing and transforming your existing healthcare data into fully compliant FHIR resources. IT ensures data from different sources:
- Is converted into FHIR-standard vocabularies (SNOMED CT, LOINC, RxNorm, ICD-10).
- Has no missing, ambiguous, or conflicting data.
- Retains its clinical meaning post-transformation.
Now, how do we achieve this?
Step 1: standardize your terminology
We need to replace or map proprietary terminologies into CMS-mandated standards, for example:
| Source Data | Target Standard (FHIR) | Example |
| Clinical Diagnoses | SNOMED CT / ICD-10 | Proprietary codes → SNOMED CT codes |
| Lab Results | LOINC | Local test codes → LOINC codes |
| Medications | RxNorm | Local drug identifiers → RxNorm codes |
Instead of embedding the mappings directly into the application logic, the table requires early creation. Terminologies evolve over time, which means frequent updates to the mappings.
Step 2: implement the logic for normalization and transformation
The next step is to use Azure Functions to build scalable normalization workflows. An example below shows the transformation of a clinical observation into a FHIR Observation resource:
FunctionName("NormalizeObservation")]
public static async Task<IActionResult> NormalizeObservation(
[HttpTrigger(AuthorizationLevel.Function, "post")] HttpRequest req,
ILogger log)
{
var inputJson = await new StreamReader(req.Body).ReadToEndAsync();
var sourceObservation = JsonConvert.DeserializeObject<SourceObservation>(inputJson);

// Normalize and map local lab code to LOINC
string loincCode = TerminologyMapper.GetLoincCode(sourceObservation.LocalTestCode);

if (string.IsNullOrEmpty(loincCode))
{
return new BadRequestObjectResult(CreateOperationOutcome(
"unknown",
$"Unable to map local test code '{sourceObservation.LocalTestCode}' to LOINC."));
}

var fhirObservation = new JObject
{
["resourceType"] = "Observation",
["status"] = "final",
["code"] = new JObject
{
["coding"] = new JArray
{
new JObject
{
["system"] = "http://loinc.org",
["code"] = loincCode,
["display"] = sourceObservation.TestName
}
}
},
["subject"] = new JObject
{
["reference"] = $"Patient/{sourceObservation.PatientId}"
},
["effectiveDateTime"] = sourceObservation.TestDate.ToString("yyyy-MM-ddTHH:mm:ssZ"),
["valueQuantity"] = new JObject
{
["value"] = sourceObservation.ResultValue,
["unit"] = sourceObservation.ResultUnit,
["system"] = "http://unitsofmeasure.org"
}
};

return new OkObjectResult(fhirObservation);
}

// Helper method for FHIR OperationOutcome error responses
private static JObject CreateOperationOutcome(string issueCode, string details)
{
return new JObject
{
["resourceType"] = "OperationOutcome",
["issue"] = new JArray
{
new JObject
{
["severity"] = "error",
["code"] = issueCode,
["details"] = new JObject
{
["text"] = details
}
}
}
};
}
Always include clear error handling (e.g., OperationOutcome) when normalization fails due to missing terminology mappings.
Step 3: handle incomplete or ambiguous data
In real-world healthcare datasets, there will be partial and unclear records. Misinterpretations can affect patient safety and compliance, so confirm intended meanings with clinicians as early as possible.
For missing values, document the data using FHIR’s built-in DataAbsentReason extension:
{
"resourceType": "Observation",
"valueQuantity": {
"extension": [{
"url": "http://hl7.org/fhir/StructureDefinition/data-absent-reason",
"valueCode": "unknown"
}]
}
}
Step 4: validate transformed data against FHIR profiles
Before committing data to Azure Health Data Services, validate it explicitly against the US Core Implementation Guide profiles. Tools like the official HL7 FHIR Validator or Firely FHIR Validator are of great help here.
#5 Synchronize the data to avert instability
One of the downsides of the cloud-native approach is that pushing source data into the FHIR service creates a parallel data store. Without synchronization, there’s no way to ensure that patient data remains accurate, timely, and consistent across systems.
Synch is a straightforward process on paper. However, real-world projects may present significant challenges:
- Concurrent updates of patient data in multiple sources.
- Event ordering to ensure data events arrive in a logical, time-consistent order.
- Idempotency to prevent data loss or corruption during duplicate or replayed synchronization events.
- Resilience and fault-tolerance for reliable data flow despite failures.
One way to tackle these challenges is to use an event-driven messaging infrastructure. We’ll use Azure Service Bus for guaranteed message delivery, durability, ordering, and built-in support for idempotent processing.
Step 1: provision Azure Service Bus resources
- Create a Service Bus namespace dedicated to healthcare synchronization.
- Create queues or topics/subscriptions for each primary data type (patients, claims, observations).
Step 2: publish messages from source systems
Each time normalized data is ready, publish it reliably to Azure Service Bus:
public async Task PublishPatientUpdateAsync(PatientUpdate patientUpdate)
{
var client = new ServiceBusClient("<connection_string>");
var sender = client.CreateSender("patient-updates");

var messagePayload = JsonConvert.SerializeObject(patientUpdate);

var message = new ServiceBusMessage(messagePayload)
{
MessageId = patientUpdate.EventId, // critical for idempotency
SessionId = patientUpdate.PatientId, // ensures event ordering per patient
ContentType = "application/json"
};

await sender.SendMessageAsync(message);
}
We recommend setting the MessageId explicitly to ensure idempotency and use SessionId for strict event ordering for the same patient’s data.
Step 3: consume and store messages in Azure FHIR Service
We’ll use Azure Functions to consume messages and write them reliably into Azure Health Data Services:
[FunctionName("SyncPatientUpdates")]
public static async Task Run(
[ServiceBusTrigger("patient-updates", Connection = "ServiceBusConnection")] ServiceBusReceivedMessage message,
ILogger log)
{
var payload = message.Body.ToString();
var patientUpdate = JsonConvert.DeserializeObject<PatientUpdate>(payload);

using var httpClient = new HttpClient();
httpClient.DefaultRequestHeaders.Authorization = new AuthenticationHeaderValue("Bearer", "<FHIR_API_ACCESS_TOKEN>");

var fhirPatient = TransformToFhirPatient(patientUpdate);
var fhirPatientJson = JsonConvert.SerializeObject(fhirPatient);

var response = await httpClient.PutAsync(
$"https://<your-fhir-service>.azurehealthcareapis.com/Patient/{patientUpdate.PatientId}",
new StringContent(fhirPatientJson, Encoding.UTF8, "application/fhir+json"));

if (!response.IsSuccessStatusCode)
{
log.LogError($"Failed to sync patient: {patientUpdate.PatientId}. Response: {response.StatusCode}");
throw new Exception("FHIR sync failed"); // trigger retry
}

log.LogInformation($"Successfully synced patient: {patientUpdate.PatientId}");
}

private static JObject TransformToFhirPatient(PatientUpdate update)
{
return new JObject
{
["resourceType"] = "Patient",
["id"] = update.PatientId,
["name"] = new JArray(new JObject
{
["use"] = "official",
["family"] = update.LastName,
["given"] = new JArray { update.FirstName }
}),
["birthDate"] = update.DateOfBirth.ToString("yyyy-MM-dd")
};
}
Step 4: ensure idempotency
Synchronization must handle duplicate messages gracefully:
- Define a unique event ID (MessageId) for each message (e.g., source system timestamp + record ID).
- Check event IDs or versions before processing updates (if applicable).
Use FHIR conditional updates to prevent unwanted duplicates:
PUT [base]/Patient?identifier=system|identifier-value
Step 5: handle data concurrency and ordering
Enforce message ordering per patient using Azure Service Bus sessions (SessionId) . We can also manage data versioning explicitly in FHIR (meta.versionId) if concurrent updates frequently occur.
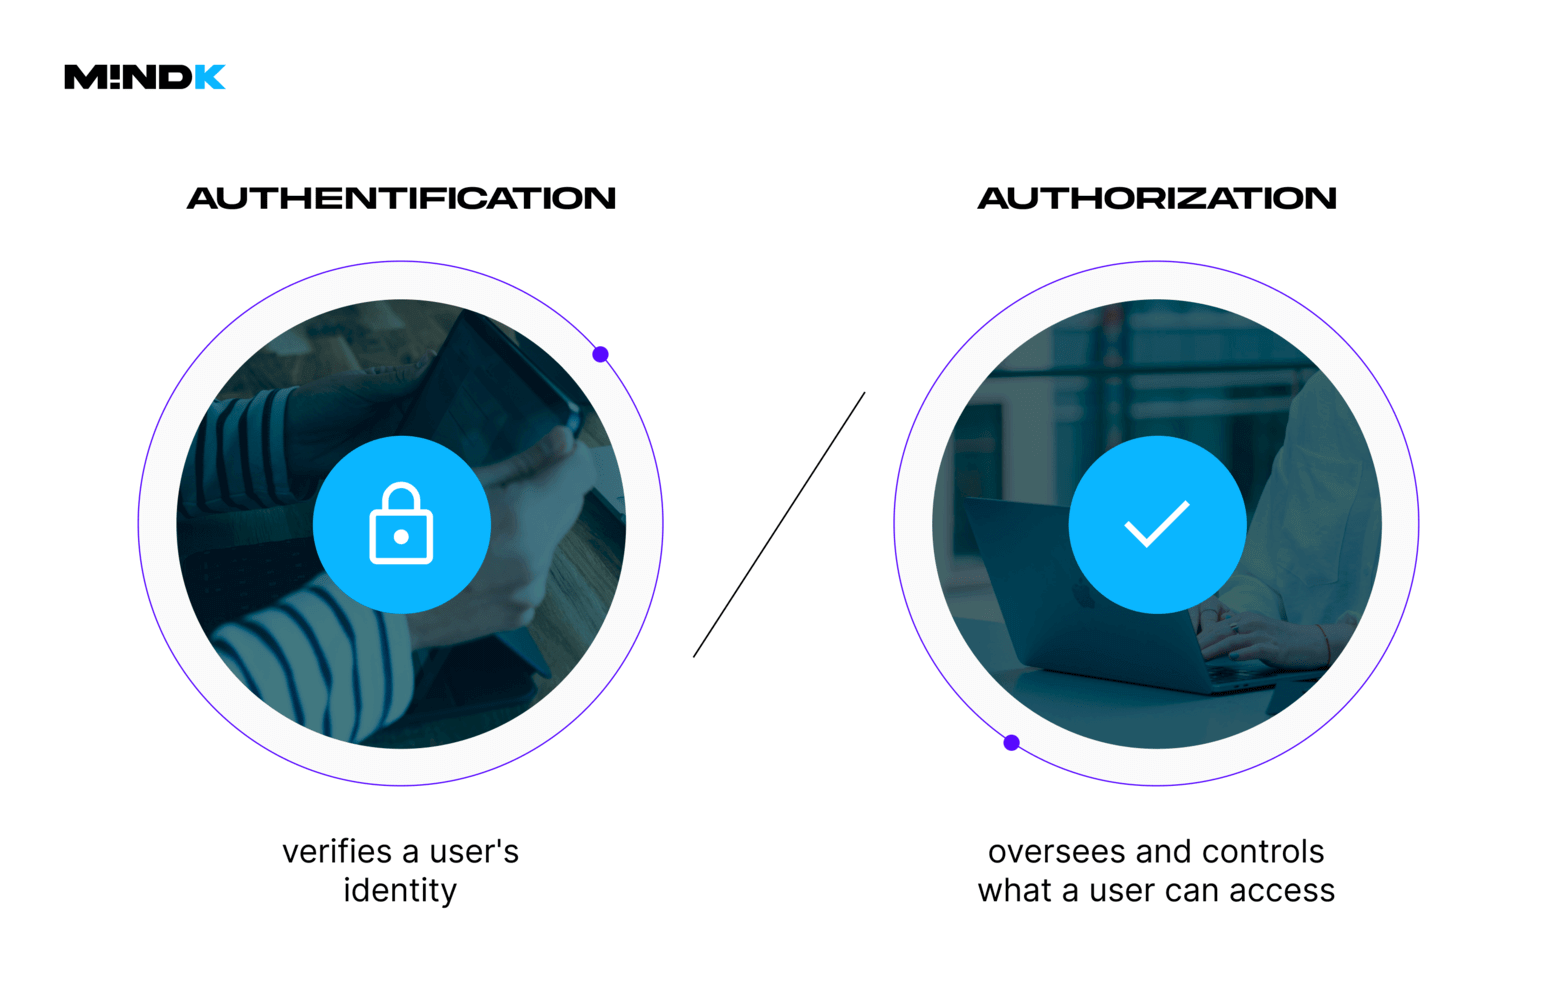
#6 Set up authorization, authentication, and consents
Securing your Patient Access API means clearly managing authentication (identity), authorization (permissions), and patient consent.
Our Azure stack does most of the heavy lifting. Azure Entra ID provides secure patient identity management with built-in OAuth 2.0 and OpenID Connect. It’s HIPAA compliant by default and aligns with SMART on FHIR standards.
CMS mandates explicit management and clear documentation of patient consent, which is easy with the FHIR Consent resource.
#7 Make your error handling patient-centric
Patients should never feel frustrated or confused about what to do. Error messages need to be clear, actionable, privacy-sensitive, and accessible to users with disabilities. Here’s what it means in practice:
- Clarify the steps a patient can take to resolve the issue.
- Embed links or buttons for common actions.
- Provide intuitive, self-service troubleshooting for minor issues.
- Include simple escalation paths for patients who can’t solve issues themselves.
- Reassure patients that personal health data was not exposed.
- Use audio descriptions, easily readable fonts, and high-contrast UI elements.
- Ensure compatibility with screen readers or accessibility tools.
- Issue SMS/email updates for persistent or system-wide issues.
| Bad | Good |
not-found | We couldn’t find your records. Please check your insurance info or try again later. |
forbidden | You’re not authorized to access this data. Try logging in again or contact support. |
invalid | Something went wrong. Please verify your information or contact our help team. |
FHIR provides the OperationOutcome resource for structured error responses. However, those messages are usually of a technical nature. You may use two key fields to include both technical and patient-friendly messaging:
details.textfor technical explanation for developers or logging.diagnosticsfor human-readable explanation.
Those are mandatory requirements. Add optional enhancements like returning error messages in the patient’s preferred language via the Accept-Language header. You might also want custom application-level codes in an extension for traceability, as well as log each error (excluding PHI) for review and QA.
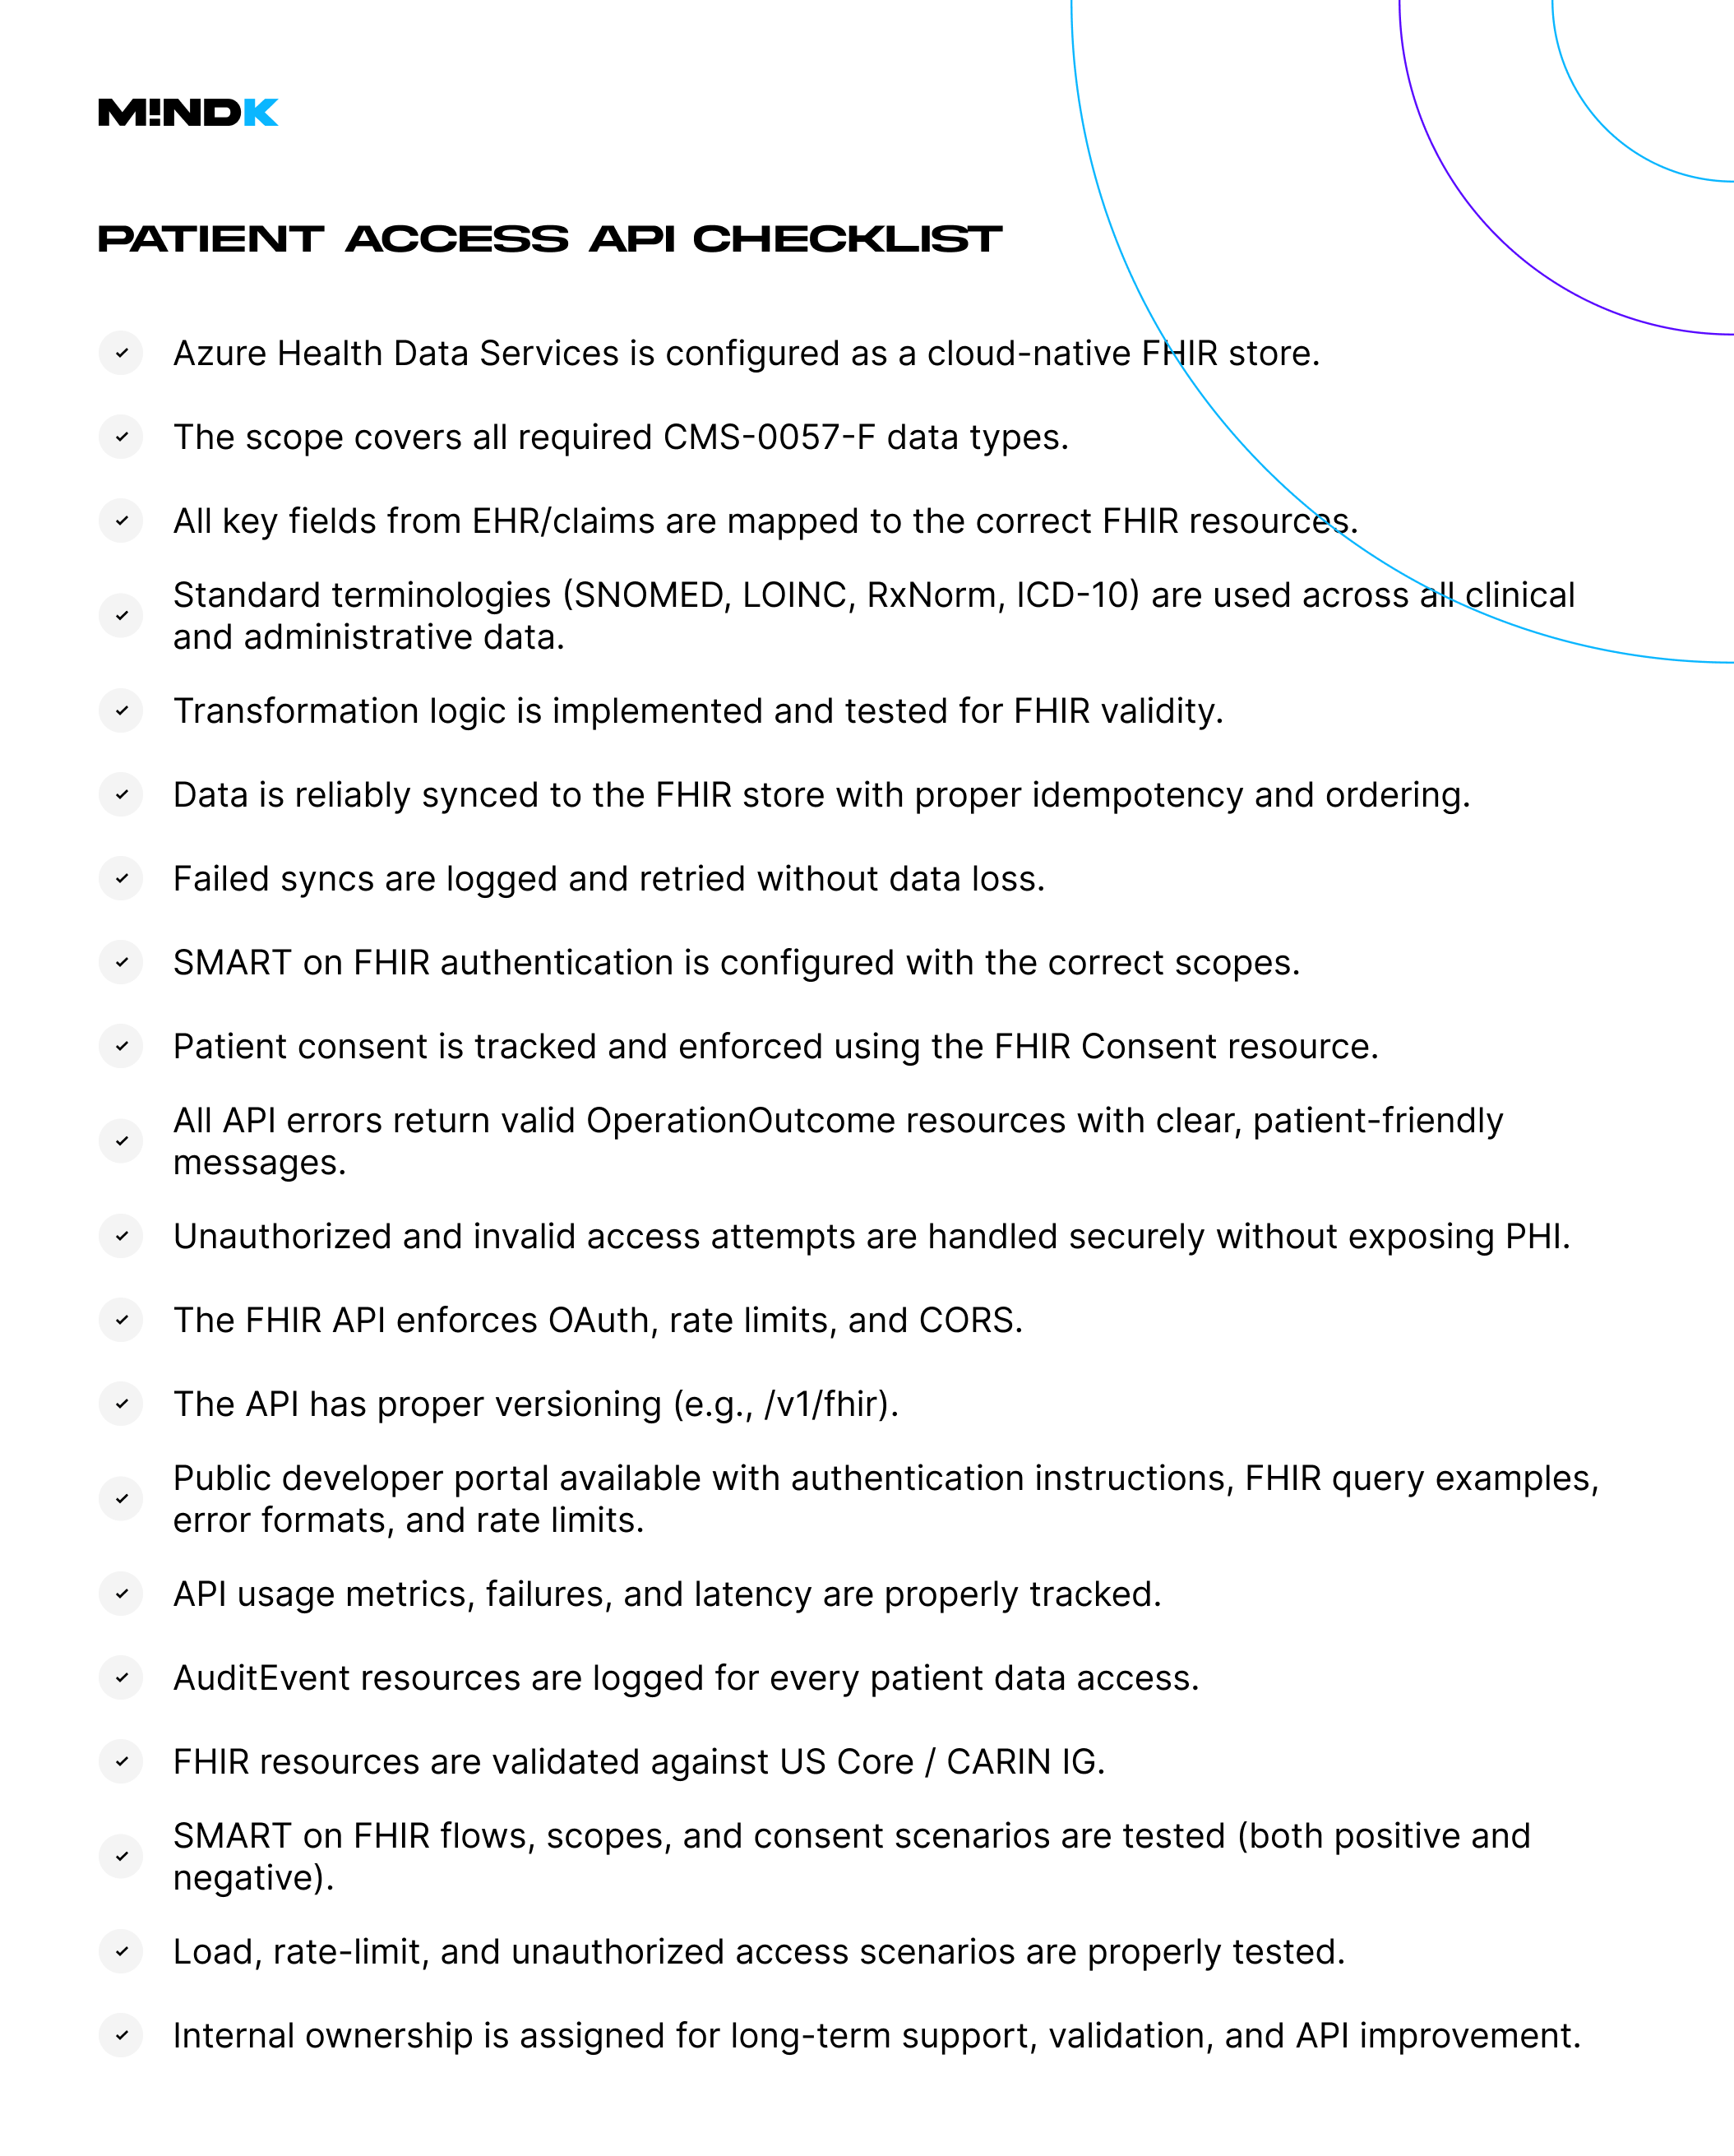
#8 Test and validate the Patient Access API
It’s essential to ensure your Patient Access API is CMS-0057-F compliant, FHIR-conformant, and reliable in real-world usage. Thorough testing and validation will help you catch regulatory, interoperability, and data integrity issues before they cause real harm.
| Test type | Description | Recommended tools |
| FHIR Conformance testing | Validate structure and compliance of FHIR resources (profiles, extensions, terminology bindings) | HL7 FHIR Validator, Inferno |
| API Contract testing | Validate all FHIR endpoints return expected data under different query patterns | Postman + OpenAPI specs |
| SMART on FHIR Flow testing | Ensure OAuth 2.0/OpenID Connect flows, scopes, and access tokens behave as expected | SMART App Launch Tester |
| Security testing | Confirm token validation, unauthorized access denial, and consent-based access restrictions | CodeQL, GitHub security, JMeter |
| Performance testing | Validate response times under concurrent requests, API quotas, and retry behaviors | JMeter or Azure Load Testing |
#9 Expose the FHIR API endpoints securely
Once the data is mapped, normalized, transformed, and synchronized into Azure Health Data Services, you must expose it to third-party applications via a secure FHIR API.
We’ll use Azure API Management (APIM) as a secure gateway to:
- Control access to your Azure FHIR API
- Enforce rate limiting, quotas, and scopes
- Provide developer onboarding and interactive docs.
- Log access for monitoring and audit.
Our first step is to import Azure FHIR API into API Management. Use the OpenAPI specification for the Azure FHIR service (/metadata endpoint). Then, configure APIM to forward requests securely to the underlying Azure Health Data Services instance.
The next step is to secure the exposed API by enforcing OAuth 2.0 with SMART on FHIR scopes like patient/Observation.read, patient/Condition.read, and launch/patient, offline_access.
We’ll also need to integrate APIM with your Azure AD tenant and use Application Insights or custom policies for audit logging. Apply policies in APIM:
- Limit request rate (e.g., 1000 requests/hour per client).
- Detect and reject malformed FHIR queries
- Reject overly broad or unsafe search parameters.
<rate-limit calls="1000" renewal-period="3600" />
<validate-jwt header-name="Authorization" failed-validation-httpcode="401" require-scheme="Bearer">
<openid-config url="https://login.microsoftonline.com/{tenant}/v2.0/.well-known/openid-configuration" />
<required-claims>
<claim name="scp">
<value>patient/*.read</value>
</claim>
</required-claims>
</validate-jwt>
#10 Implement monitoring and observability
Monitoring and observability are essential to meeting CMS-0057-F, HIPAA, and SMART on FHIR requirements. It’s a pretty complex topic that requires its own article to do justice. In short, we need to:
- Detect and alert on failures (availability, authentication, data sync issues).
- Track access to patient data (audit logging for compliance).
- Identify abusive usage or misconfigured third-party apps.
- Provide telemetry to support future improvements.
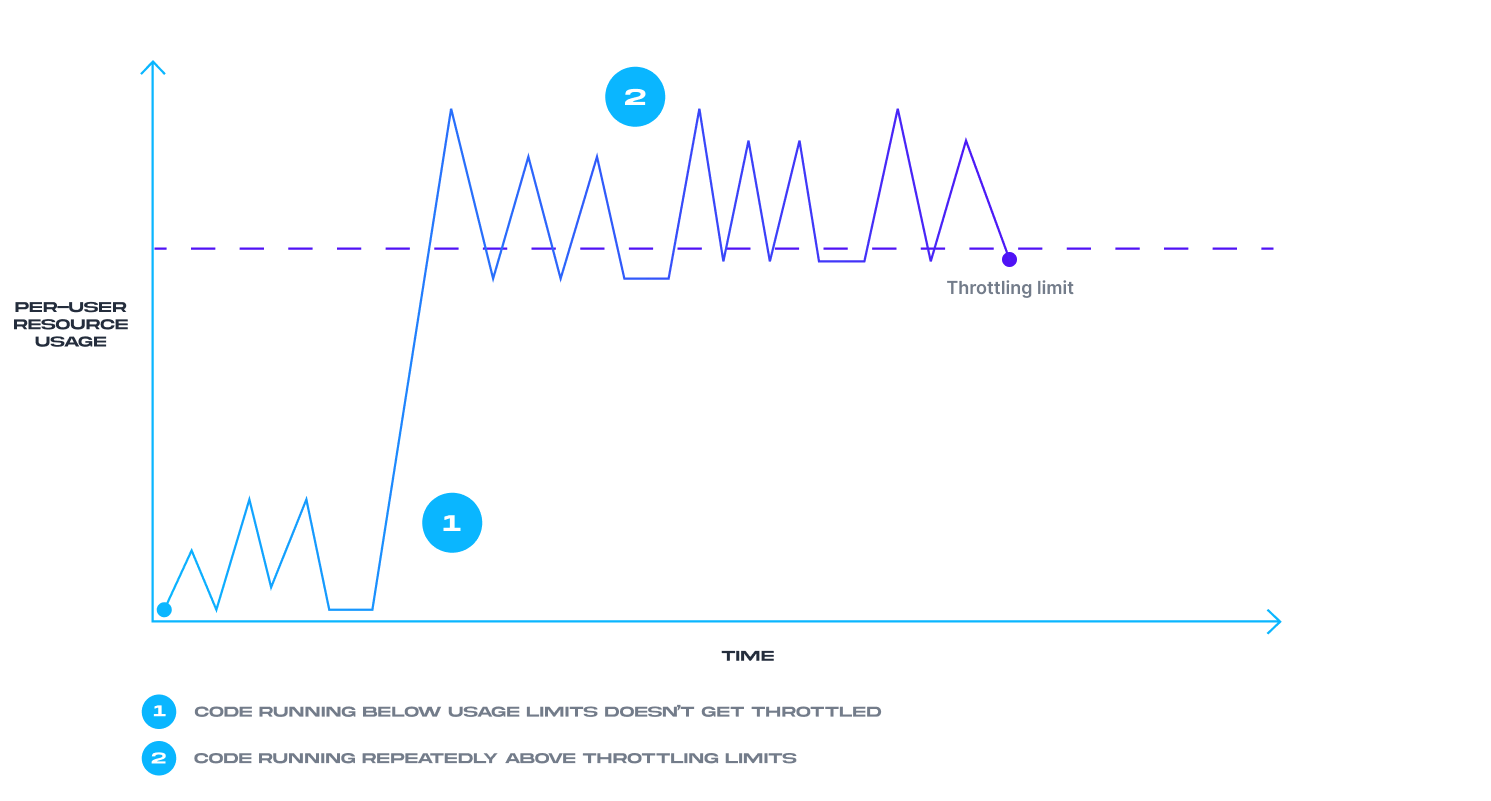
| Area | Metrics & events to monitor |
| Availability | API uptime, request success/failure rates, latency, retries. |
| Security | Unauthorized requests, invalid tokens, consent violations, throttling. |
| FHIR-specific access | Read/write activity per resource type (e.g., Patient, EOB, Observation). |
| Audit trail | Who accessed what data, when, and under what consent. |
| Rate limiting | Requests per user/app; 429 (Too Many Requests) responses. |
| Transformation errors | Failed data sync, normalization mismatches, bad FHIR payloads. |
You can use Azure Monitor + APIM for real-time metrics and alerting, and log FHIR AuditEvent resources to meet compliance requirements. It’s also important to have proactive alerts on anomalies as opposed to reactive-only alerts. Remember, a well-monitored Patient Access API is not just technically sound; it’s legally defensible and trustworthy.
#11 Publish interactive docs for developers
CMS-0057-F doesn’t just mandate that the API be available; it must also be usable, securely accessible, and well-explained. Therefore, we need to provide external developers with all the information required to:
- Authenticate using SMART on FHIR flows.
- Discover available FHIR resources and query parameters.
- Understand usage limits, scopes, and patient access behavior.
- Test and troubleshoot their integration easily.
Azure API Management (APIM) Developer Portal is our preferred way to provide these resources via OpenAPI or FHIR metadata.
#12 Maintain the API usability and compliance
You now have a secure, scalable, developer-friendly, and CMS-compliant Patient Access API. Ensuring it stays this way requires ongoing attention.
The first part of these efforts is to track the evolving CMS and FHIR standards. Subscribing to CMS Interoperability Updates, HL7 Announcements, and the FHIR Dev Forum helps keep up with these changes.
The second part is improving the user experience. For this reason, both the developer portal and patient-facing apps must include clear feedback mechanisms. When handling feedback, prioritize complaints about error messages, latency, and inconsistent data availability.
When publishing new versions of the API, include the appropriate URL request headers (/v1/fhir/, /v2/fhir/) and use semantic versioning for breaking vs. non-breaking changes.
Finally, periodic regression testing is a must-have, especially when updating terminology mappings, consent, or authorization logic.
Conclusion
Exposing a Patient Access API is one of the key requirements in CMS-0057-F. Most of the steps in this guide are pretty straightforward. However, data mapping, normalization, and synch are often quite tricky on real-world projects. Moreover, failures in these areas go unnoticed unless you have solid monitoring and observability.
That’s why implementing a Patient Access API requires solid business analysis, planning, and budgeting. Above all, it requires technical expertise. At MindK, we have vast experience with FHIR, healthcare integrations, and interoperability. Don’t hesitate to contact us if you have any questions or need help with CMS-0057-F compliance.