
AI agents are now major API consumers. These consumers can both make incredibly dumb mistakes and attack your systems at a rate no human will ever match. Yet, less than a quarter of API developers account for this reality. Strange enough, agent-first design also makes APIs better for the meat-and-blood engineers.
When you have clear contracts, well-defined errors, and documentation with realistic examples, the API behaves predictably for everyone. As a software engineer with 16 years of experience and a CTO at MindK, I believe that API development will remain an essential skill. Today, I will detail how to make an API in five steps.
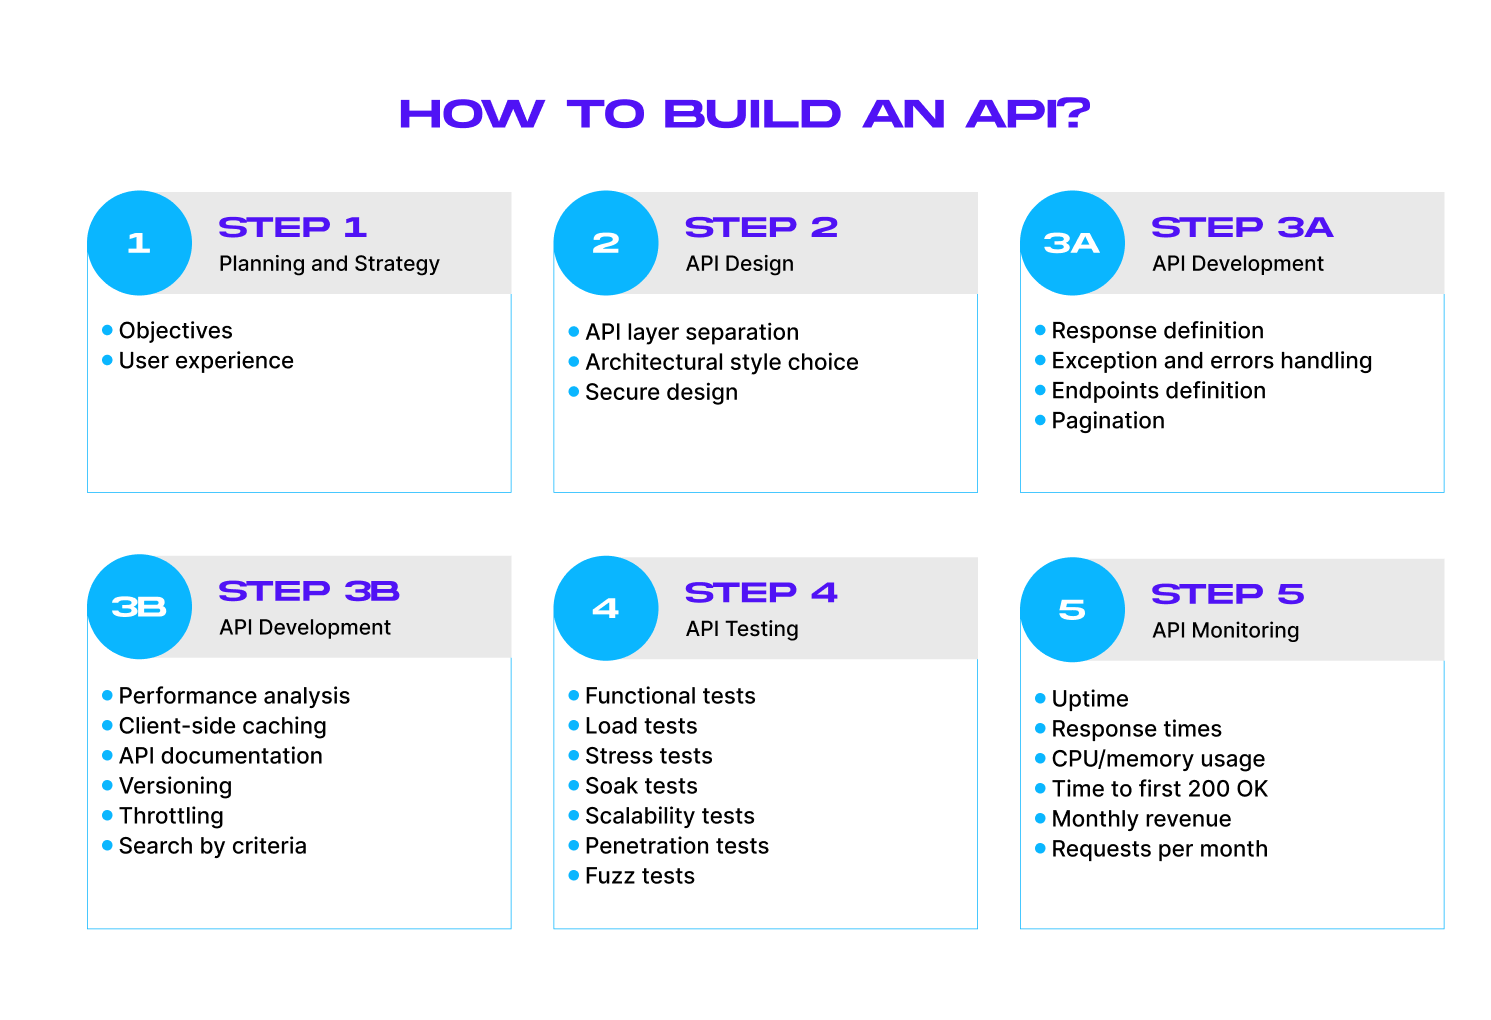
We’ll start with the important questions you need to answer before developing an API. You’ll then learn about the key API design principles and architectural styles before proceeding with REST API development. The guide also covers API testing and optimization to make your backend fast and secure against agent-driven attacks.
Table of contents:
- Step #1. Planning & strategy
- Step #2. API design
- Step #3. API development
- 1. Define basic API responses for positive cases
- 2. Handle exceptions and errors
- 3. Build an API endpoint
- 4. Implement pagination and search by criteria (as a part of GET requests)
- 5. Analyze your API performance
- 6. Implement client-side caching, if needed
- 7. Create API documentation
- 8. Add versioning (for a public API)
- 9. Use throttling designed for high-frequency automation
- Step #4. API testing
- Step #5. API monitoring and improvement
- Conclusion
Step #1. Planning and strategy
The API should bring value to both intended users and your organization. So, start with your goals and intended users.
For example, a private API will only get used by the engineers inside your company. In this case, you’ll have a better understanding of its target audience. Public APIs, on the other hand, can be used by anybody who has the API key.
To satisfy their needs, you’ll need more information about the target audience:
- Who are the developers that could benefit from your API (their domain, needs, goals, and so on)?
- How can you incorporate their needs into the API?
- How can you provide a better developer experience?
- Which tools do you need to provide along with the API (developer programs, SDKs, documentation, educational resources, and so forth)?
AI agents represent a significant chunk of API users. Postman’s 2025 State of API report shows that OpenAI alone was responsible for 4.2 million calls over the past year.
Understanding user needs helps to define the API requirements. Functional requirements determine the things your API can do, while non-functional requirements deal with things like performance, reliability, and security.
Agents don’t behave as typical users. They will fail silently without predictable schemas, clear behavioral rules, typed errors, and high-quality documentation. They can also access your endpoints thousands of times a second, creating unprecedented security threats.
I’ve long been an advocate of shifting security left. This means involving the security guys from the earliest design discussions instead of post-development reviews. At least one developer in each Scrum team can serve as a “security champion” who’s trained in threat modeling and can catch issues early.
Step #2. API design
Our next task is to come up with an architecture that fits these requirements.
There are two broad approaches to custom API development. The first is the backend for front-end design (BFF). It includes a BFF orchestration layer for each of your front-ends. A well-designed BFF is simple, fast, and resilient. However, it’s only tailored to one specific front-end.
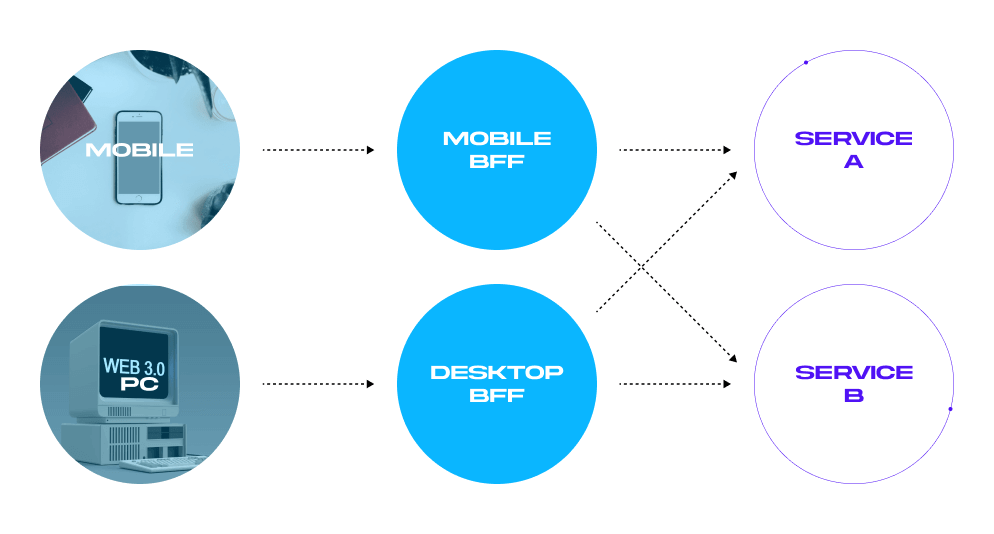
This is often a problem for larger projects. For example, my team recently built an AI-powered app for rapid drug testing. The client, however, thought about expanding the app to include up to 400 healthcare services in the future. So, starting with a universal API, well-defined limits, and a detailed description made more sense.
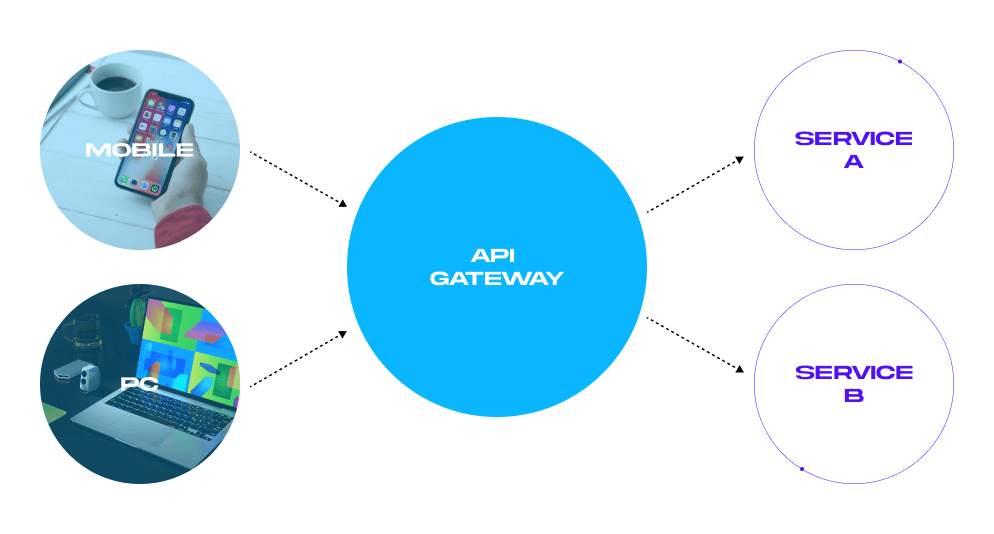
The second approach is using an API Gateway. It serves as a single point of connection between all clients. We prefer this approach for its consistency, reusability, and future-proof design. It also improves developer experience across companies.
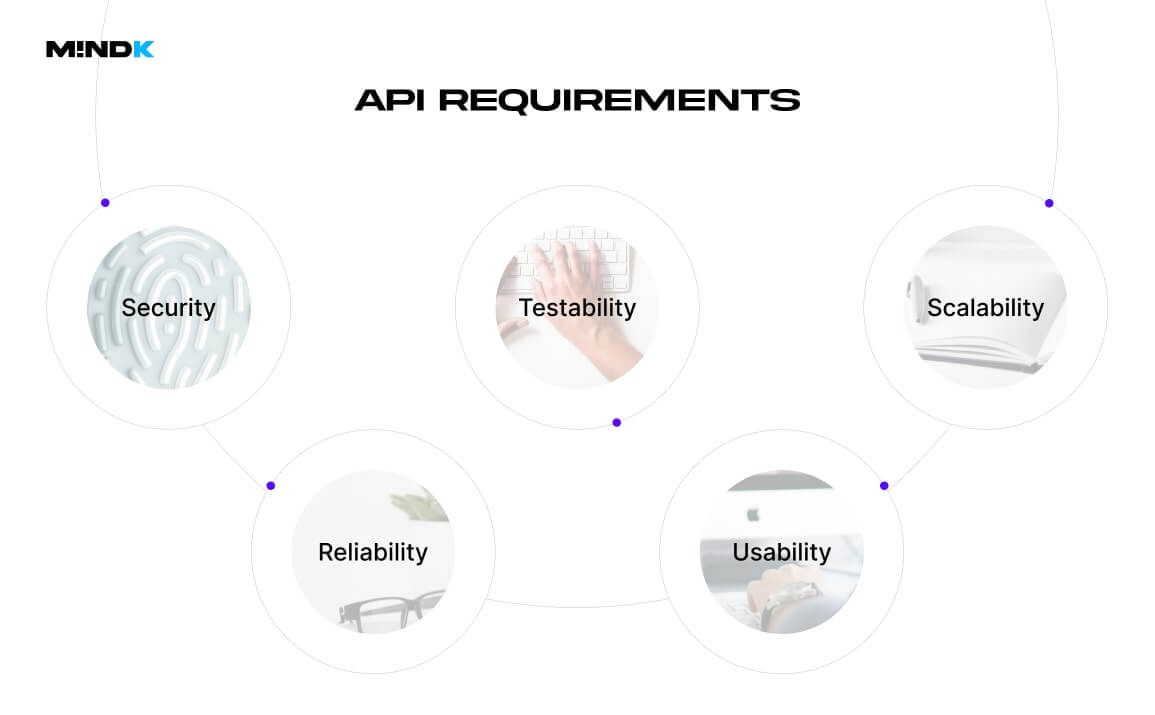
Regardless of your architectural style, all APIs have to meet five non-functional requirements:
- Usability: developers should be able to learn and use your API with minimum effort.
- Reliability: the API should have minimal downtime.
- Scalability: the system should handle load spikes.
- Testability: testers should be able to easily identify any defects.
- Security: the API should be protected from malicious users.
Here’s how to design an API that satisfies these requirements.
1. Separate API design into three layers
At MindK, we recommend splitting your API into 3 layers, each responsible for a single requirement. These layers (depicted in the picture below) sit between the client and the API logic:
- Validation layer controls access to all interactions within the application.
- Caching layer sends caching instructions to the client.
- Orchestration layer combines data from multiple sources.
I advise keeping your API as small as possible for easier maintenance, backward compatibility, and controlled improvement.
You can always add functionality but never remove it. As consumers quickly begin relying on the current endpoints, changing or removing them can cause integrations to break—leading to downtime, lost data, or the need to rewrite client code.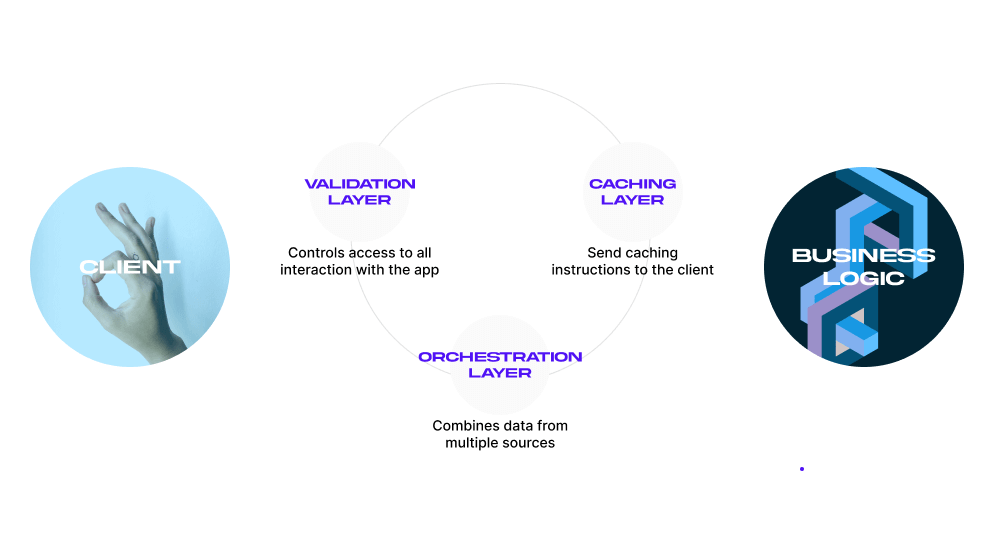
2. Choose your architectural style
There are several common approaches to API architecture, including the outdated SOAP, as well as modern REST and GraphQL. You can compare their main differences in the table below:
| SOAP | REST | GraphQL |
| An official protocol with strict guidelines. | A flexible architectural style with a number of loose guidelines. | A complex query language with flexible and powerful functionality. |
| Works with application layer protocols like HTTP, UDP, and SMTP. | Works only with HTTP. | Operates over HTTP. |
| Requests can’t be cached. | Requests can be cached. | Limited caching support. |
| Requires detailed API contracts. | No detailed contracts needed. | No detailed contracts needed. |
| Has built-in security, error handling, and authorization. | Developers have to take care of security, error handling, and authorization. | Developers have to take care of security, error handling, and authorization. |
Uses a verbose XML data format for communication that consumes more bandwidth. | Uses a variety of data formats, including JSON, XML, HTML, and plain text. | Primarily uses JSON. |
| Provides data as services (verbs + nouns: https://my-api/get-user-data). | Provides data as representations of resources (nouns only: https://my-api/users). | Clients define exactly what data they need (nouns) and how it should be fetched or modified (verbs) |
➕Benefits: security is easier to implement. | ➕Benefits: higher performance, scalability, and flexibility. | ➕Benefits: flexible, scalable, easy for new team members to understand. |
➖Drawbacks: difficult data processing, XML formatting mistakes can cause difficult-to-diagnose errors, additional libraries needed. | ➖Drawbacks: requires versioning, lacks strong typing, prone to under- and over-fetching. | ➖Drawbacks: N+1 performance problem, ill-suited for external integrations, security requires a lot of limitations. |
| ✅Great for: legacy enterprise apps with high security requirements. That’s all. | ✅Great for: microservices, internal and public APIs for web and mobile apps. | ✅Great for: internal APIs, data-driven apps, and real-time updates. |
| SOAP Specifications | REST Specifications | GraphQL Specifications |
3. Make your API RESTful
REST is the most popular approach to making web APIs. 93% of developers now report using the REST architecture, vs. 33% for GraphQL and 25% for SOAP.
At MindK, we prefer the REST’s ease of work, better performance, and scalability. Its great flexibility provides more freedom to create an API as long as your architecture follows six constraints that make it truly REST-ful:
- Uniform interface. Requests from different clients (for example, a mobile app and a website) should look similar. One resource in your system must have a single name, called Uniform Resource Identifier. It will be referenced in all API requests (https://my-api/users).
- Statelessness. Servers don’t store information about previous interactions. Each API request should provide the necessary context.
- Separation of concerns. Develop the app’s backend independently from its user interface.
- Caching of responses. Servers should inform clients whether the response can be stored in the cache.
- Multiple communication layersbetween the server and the client.
- Code on request. If requested, API responses might include executable code.
REST relies on a familiar HTTP protocol, so developers can get up to speed much faster. A human-readable JSON format is lighter than XML, easier to parse, and works with all programming languages.
If a custom API needs to work with JSON and XML (for example, in legacy systems), you can change output via request headers depending on the requested format.
The best way to design REST APIs for humans and agents alike is to follow the OpenAPI Specification. It’s a widely accepted and language-agnostic standard for building an API interface.
It allows both machines and humans to understand the API functionality without accessing source code or reading the documentation. Use the standard to generate docs, clients, and servers in different languages.

4. Think about security
According to The State of API Security in 2024 Report, 71% of all web traffic is API-related. Poorly designed APIs expose your system to improper authentication, injections, replay attacks, stack trace leaks, DDoS attacks, and other API security threats.
These risks only grow with the proliferation of AI agents. They behave unpredictably, which makes it difficult to discern attacks from legitimate usage. They can probe for vulnerabilities thousands of times per second, pretty much indefinitely. Just one API key compromised by an agent can open a backdoor to massive amounts of sensitive data across many systems.
So, how to secure a REST API in this new reality? We’ll need to account for agent-based attacks when designing our four security layers:
- Identification (who is accessing your API)
Start by tagging traffic with a simple header to distinguish between human, system, and agent users. Unique randomized identifiers called API keys can identify who accesses your API and help detect “unlawful” behavior. These API keys should have granular scoping, with the least amount of privilege given to AI agents.
As API keys aren’t encrypted, other security measures to protect your API are required. Moreover, sending such keys in a Uniform Resource Identifier (URI) makes extracting them from browser history possible. I recommend sending the keys via the Authorization HTTP header as it isn’t recorded in network logs.
- Authentication (can they prove their identity)
You can use OpenID for authentication. It redirects developers to an authorization server where they can confirm their identity with a combination of login + password.
- Authorization (what are they allowed to do)
Authenticated users need a list of permissions that match their access level. OAuth2 is our preferred authorization method. It’s faster and more secure than other mechanisms as it relies on tokens instead of usernames and passwords.
To account for agentic users that can attack the system indefinitely, you’ll need to make your tokens tighter, short-lived, and use automatic rotation of credentials.
- Encryption (making sure the data is unintelligible to unauthorized users)
Use SSL/TLS encryption to protect API traffic against certain attacks like credential hijacking and eavesdropping. You should also use end-to-end encryption for sensitive data like medical records or payment details. You can use tokenization or mask the data from appearing in logs and trace tools.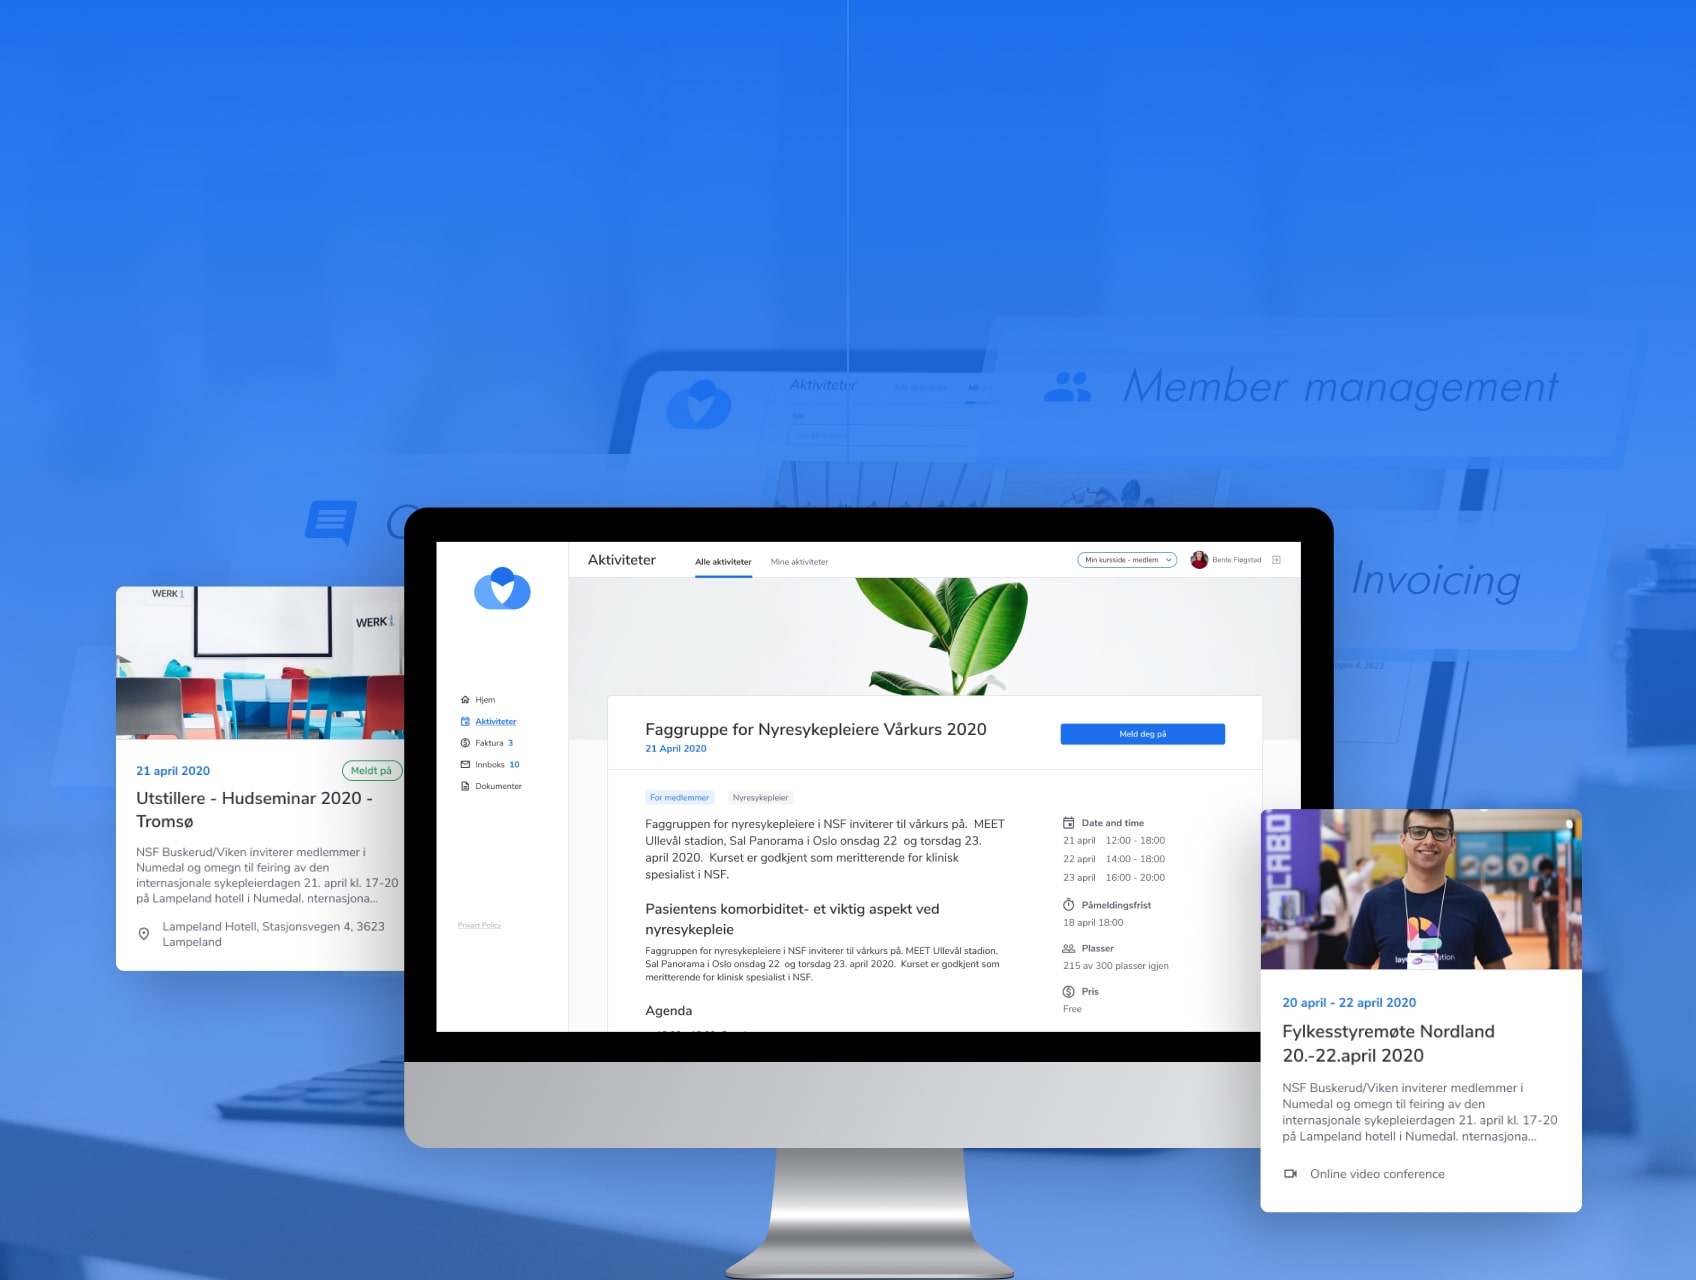
Choo i Skyen is a scalable LMS with a microservice architecture we developed for Norwegian associations. Its public REST API allows to register and promote educational courses on 3-rd party websites.
Security is often built into API frameworks. At MindK, we like to use NestJS to develop internal APIs for our web and mobile apps. In addition to excellent security, it features Typescript support, greater flexibility, and a large community.
Additional security comes from the way your APIs are deployed. We prefer AWS deployment for its large-scale security features. The cloud provider also has some nice security features, like AWS Cognito and API Gateway.
Properly countering agent-based attacks requires other security measures we’ll discuss in the next steps of API development. Below, you will find step-by-step instructions on how to build an API, along with simple examples written in NestJS.
Step #3. API development
It’s time to build your own API using an iterative process. You can’t accurately predict all API functionalities and errors ahead of time, so the project requires a solid skeleton with a standardized API flow. We like to create one feature-oriented endpoint at a time with basic functionality. Then, gradually add more fields or parameters, test them, and write detailed documentation.
1. Define basic API responses for positive cases
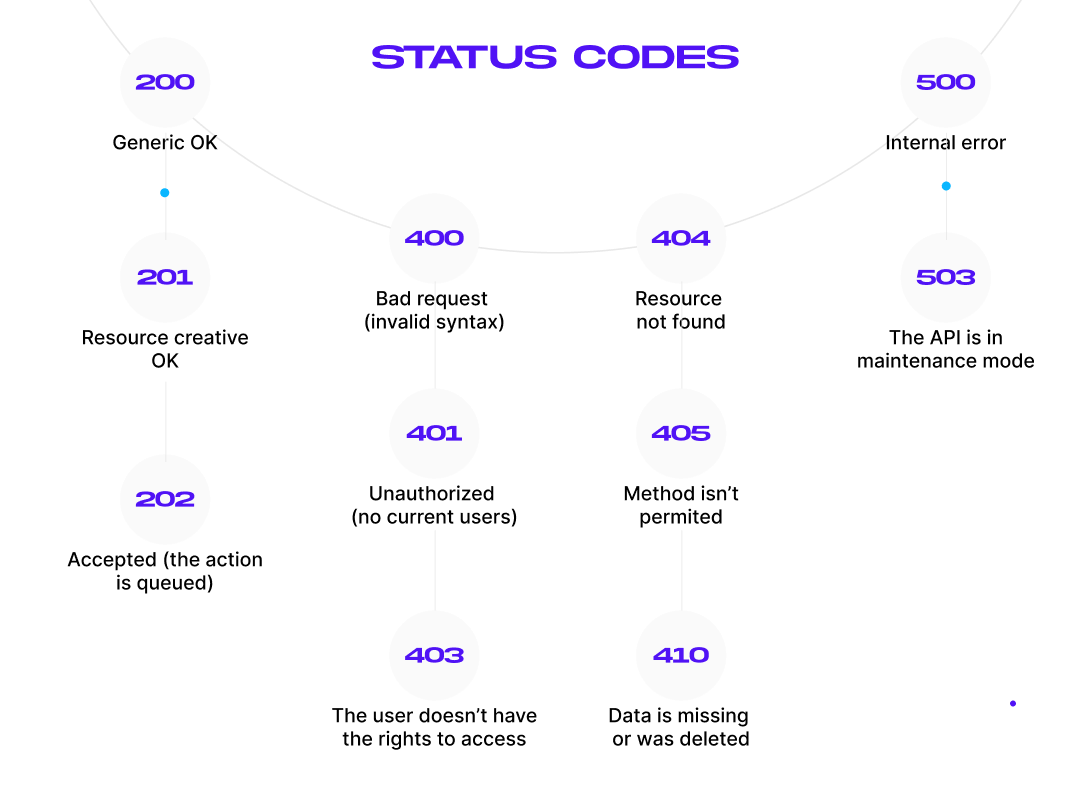
Depending on the request, the API can return a successful response or an error of some type. Either way, it’s important to standardize responses so they can be processed in a standard way by the client. Agents, in particular, require predictable patterns across endpoints, consistent naming conventions, standard HTTP status codes, and robust error handling.
Start by defining the successful response. It usually contains a status code (for example, 201: resource created OK), a time stamp, and requested data (usually in the JSON format). You can view all the status codes in the picture below:
Now, let’s define the responses using NestJS:
export class ApiResponse<T> {
  statusCode: number;<span data-mce-type="bookmark" style="display: inline-block; width: 0px; overflow: hidden; l<span data-mce-type="bookmark" style="display: inline-block; width: 0px; overflow: hidden; line-height: 0;" class="mce_SELRES_start"></span>ine-height: 0;" class="mce_SELRES_start"><<span data-mce-type="bookmark" style="display: inline-block; width: 0px; overflow: hidden; line-height: 0;" class="mce_SELRES_end"></span>/span>
  timestamp: string;
  data?: T;
  error?: string;


  constructor(statusCode: number, data?: T, error?: string) {
    this.statusCode = statusCode;
    this.timestamp = new Date().toISOString();
    this.data = data;
    this.error = error;
  }
}
2. Handle exceptions and errors
Your API should properly handle all exceptions and return correct HTTP status codes instead of a generic “500: Internal Error”. AI agents cannot understand vague descriptions and will slam the API until they hit a rate limit. It’s important to have typed error responses that give enough information for automated recovery.
import { ExceptionFilter, Catch, ArgumentsHost, HttpException, HttpStatus } from '@nestjs/common';


@Catch()
export class AllExceptionsFilter implements ExceptionFilter {
  catch(exception: unknown, host: ArgumentsHost) {
    const ctx = host.switchToHttp();
    const response = ctx.getResponse();
    const status = exception instanceof HttpException ? exception.getStatus() : HttpStatus.INTERNAL_SERVER_ERROR;

    response.status(status).json({
      statusCode: status,
      timestamp: new Date().toISOString(),
      message: exception instanceof HttpException ? exception.getResponse() : 'Internal server error',
    });
  }
}
Be careful, as custom APIs can leak sensitive information in error messages (names of servers, frameworks, classes, versions, and SQL queries used on the project).
Hackers can use this to exploit known vulnerabilities in the aforementioned resources. To counter this, use an API gateway that standardizes error messages and avoids exposing sensitive information.
3. Build an API endpoint
Simply put, an API endpoint is one end of a communication channel. It’s a URL that receives API requests:
https://my-api/this-is-an-endpoint
https://my-api/another/endpoint
https://my-api/some/other/endpoint
While developing an API endpoint, you’ll need to specify the types of requests it can receive, its responses, and errors. With the REST architecture, your endpoints can receive requests that contain different HTTP methods:
- GET to read resources from your database. As GET can’t modify data, it’s considered a safe method.
- POST to create a new subordinate resource in your database.
- PUT to update the whole resource.
- PATCH to update a part of a resource.
- DELETE to delete a resource.
GET, PUT, DELETE, HEAD, and PATCH requests must be idempotent. Repeating the same call to the same resource must lead to the same state. Always use the plural for your resources and follow standard naming conventions for consistency.
Now, let’s see how this looks in NestJS:
import { Controller, Get, Post, Body, Param, Delete } from '@nestjs/common';


@Controller('users')
export class UsersController {
  private users = [{ id: 1, name: 'John Doe' }];


  @Get()
  getUsers() {
    return this.users;
  }


  @Post()
  createUser(@Body() user: { name: string }) {
    const newUser = { id: Date.now(), ...user };
    this.users.push(newUser);
    return newUser;
  }


  @Delete(':id')
  deleteUser(@Param('id') id: number) {
    this.users = this.users.filter(user => user.id !== Number(id));
    return { message: 'User deleted' };
  }
}
After you’ve built an API endpoint, check whether it’s behaving as expected by writing a Unit and Integration test.

4. Implement pagination and search by criteria (as part of GET requests)
Sometimes, API responses contain too much data. For example, thousands of products can be relevant to a search in an e-commerce app. Sending all that in a single response would be extremely taxing on your database.
To decrease response times and protect your API against DDoS attacks, split the data into several “pages”. For easier navigation, each page should have its own URI. The API should only display a portion of data in one go and let users know how many pages remain.
There are several pagination methods to choose from:
- HTTP range headers (for binary data).
- Fixed data pages (all pages have an equal size).
- Flexible data pages (the client app specifies the page size).
- Offset and count (instead of dividing the data into pages, the API views it as a collection of items. The client can specify a starting index and the number of items to be returned).
- Default values.
For easier sorting, use various filters like time of creation or price, and implement search via a query string.
import { Controller, Get, Query } from '@nestjs/common';


@Controller('users')
export class UsersController {
  private users = Array.from({ length: 50 }, (_, i) => ({ id: i + 1, name: `User ${i + 1}` }));


  @Get()
  getUsers(@Query('page') page = 1, @Query('limit') limit = 10, @Query('search') search?: string) {
    let filteredUsers = this.users;
    if (search) {
      filteredUsers = this.users.filter(user => user.name.includes(search));
    }
    const start = (page - 1) * limit;
    return {
      page,
      limit,
      total: filteredUsers.length,
      users: filteredUsers.slice(start, start + limit),
    };
  }
}
5. Analyze the API performance befor optimizing
The API should be fast to provide an adequate developer experience. But before making any API optimization efforts, it’s important to analyze its performance. You can insert a statement about code usage and performance analysis, like AutoCannon for Node.js and Tracer, Logger, Metrics, Validation, and Kafka for AWS Lambda functions.
Also use HTTP compression to cut the size of large objects. Combining compression with streaming can reduce latency even further. Massive resources can be partitioned for faster service.
You can also use HTTP compression to cut the size of large objects. Combining compression with streaming can reduce latency even further. Massive resources can be partitioned for faster service.
This is just a small part of backend performance testing and optimization we do at MindK. If your application is sluggish and slow to respond, our engineers can run a variety of tests, including load, stress, volume, and endurance tests, as well as evaluate your databases and cloud infrastructure.
As a result, you’ll get a detailed roadmap to optimize database configurations, server resources, caching strategies; auto-scaling policies, asset delivery, code refactoring, lazy loading, and infrastructure costs.

Clinic.Js performance analysis. Source: clinicjs.org
6. Implement client-side caching, if needed
Storing data for subsequent requests can speed up the API and save traffic, as users won’t have to load the recently fetched data.
After receiving a GET request, your API could send a Cache-Control header specifying whether the data in the response is cacheable and when it will be considered expired.
import { CacheInterceptor, CacheModule, Controller, Get, UseInterceptors } from '@nestjs/common';


@Controller('users')
@UseInterceptors(CacheInterceptor)
export class UsersController {
  @Get()
  getUsers() {
    return [{ id: 1, name: 'John Doe' }];
  }
}
7. Create API documentation
Use different API documentation tools and generative AI to auto-generate docs from your OpenAPI definition layer. The docs should provide developers with all the necessary information to consume your API:
- Authentication scheme.
- Endpoints definition (their function and relations to other endpoints).
- Supported HTTP requests and responses.
- All interfaces, classes, constructors, and exceptions.
- Methods, structure, and accepted parameters for each URI.
- Error descriptions.
import { DocumentBuilder, SwaggerModule } from '@nestjs/swagger';


const config = new DocumentBuilder()
  .setTitle('Users API')
  .setDescription('API for managing users')
  .setVersion('1.0')
  .addTag('users')
  .build();


const document = SwaggerModule.createDocument(app, config);
SwaggerModule.setup('api', app, document);
High-quality documentation is especially important for agentic users. It should describe why and when an agent should use a particular endpoint. Documentation must also provide examples that match real production data instead of a placeholder to simplify the task for AI agents.
For a private API, simple reference documentation is all that’s required. The quality of documentation for a public API will directly influence its adoption rate, so provide the best documentation possible, supported by examples, SDKs, and tutorials.
Often, teams record decisions (user stories, acceptance criteria) but fail to document the rationale behind them. A short “design decisions log” helps future team members understand the context and avoids repeated mistakes.
Global teams also suffer from knowledge gaps when members leave. That’s why, it’s important to maintain a living wiki with architecture diagrams, runbooks, and known pitfalls.
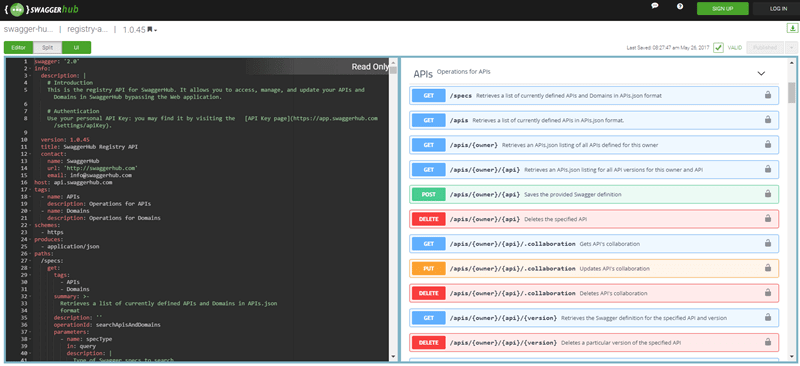
Generating API documentation using SwaggerHub platform. Source: swagger.io
8. Add versioning (for public API)
At some point, you’ll likely want to expand the API functionality. It’s critical to ensure these changes don’t break the apps that rely on your API.
Versioning allows you to specify the resources and features exposed by the API. Users can direct requests to a particular version of a resource/feature.
import { Controller, Get } from '@nestjs/common';
import { ApiVersion } from '@nestjs/swagger';
<span data-mce-type="bookmark" style="display: inline-block; width: 0px; overflow: hidden; line-height: 0;" class="mce_SELRES_start"></span>

@Controller('users')
export class UsersController {
  @Get()
  @ApiVersion('1')
  getUsersV1() {
    return [{ id: 1, name: 'John Doe' }];
  }
}
Always include a new version in the request header or in your URL (for example, yoursite.com/v1/users). Programs that work with one version of your API should be able to use its future versions (backward compatibility).
To make API changes easier on developers, add a mediation layer. It serves as a single point of service for different versions of your API. It’s also good for scalability, security, and developer experience.
9. Use throttling designed for high-frequency automation
Sudden traffic increases can disrupt your API as part of Denial of Service (DDoS) attacks. To prevent this, use:
- Traffic quotas. Limit the number of requests an app can make per hour/week/month.
- Spike arrests. A rate at which an app can make requests per minute/second. Calls that exceed this limit get their speed reduced.
- Concurrent rate limits. An app can’t make more than x parallel connections to your API.
import { Controller, Get } from '@nestjs/common';
import { Throttle } from '@nestjs/throttler';


@Controller('users')
export class UsersController {
  @Get()
  @Throttle(10, 60) // 10 requests per minute
  getUsers() {
    return [{ id: 1, name: 'John Doe' }];
  }
}
Preparing for AI-enhanced attacks requires API developers to adopt dynamic rate limiting based on behavioral patterns instead of the more traditional requests-per-minute approach.
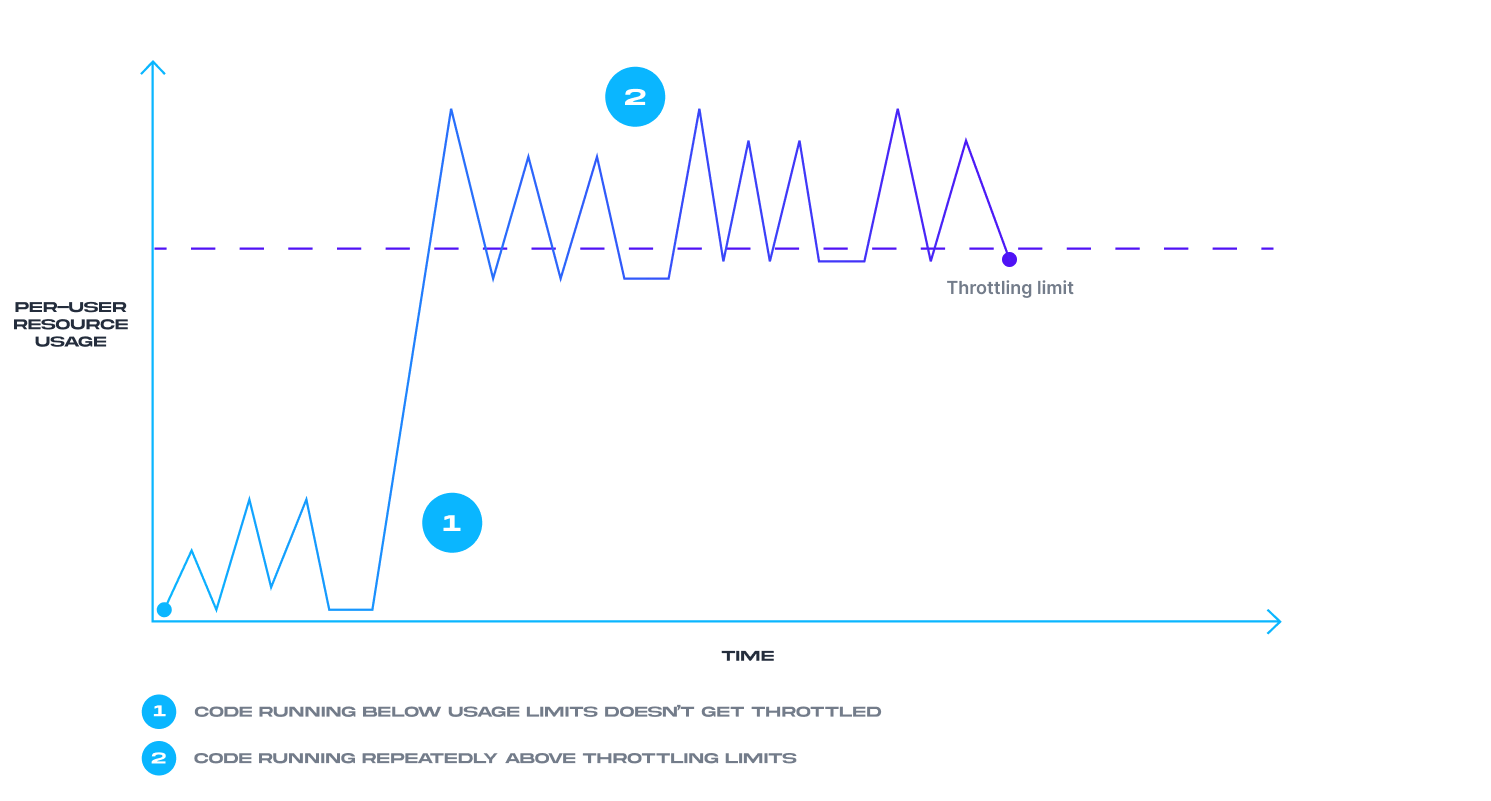
How API throttling works
Step #4. API testing
With API virtualization, you can start testing the API before it’s finished. In addition to Unit and Integration tests, you can perform Functional, Reliability, Load, Security, and other tests. Here are a few general rules for API testing:
- Test API functions in isolation.
- Use realistic data for realistic results.
- Test under a variety of network conditions that users might encounter in production.
- Simulate errors and edge cases by rapidly changing responses.
- Don’t use live APIs for performance testing.
The latest State of API report highlights a disturbing lack of contract testing. With agentic consumers, changing a single property name might cause the entire workflow to fail silently. So, ensure the API spec matches what you actually deploy before making anything public.
Step #5. API monitoring and improvement
Done with testing and reviewing? It’s time to deploy your API to production. Most enterprise APIs are hosted on API gateways that guarantee high security, performance, and scalability. But gateways alone might not be enough.
BOLA (Broken Object Level Authorization) is one of the top security risks in custom API development. It allows malicious actors to manipulate API data/resources without authorization. Eliminating this risk requires proper monitoring and logging of API usage, potential anomalies, and unauthorized access. .
After deploying your API, you’ll have to monitor its success metrics. Depending on the goals and type of API, you might want to track:
- API uptime.
- Requests per month.
- Monthly unique users.
- Response times.
- Server CPU/memory usage.
- Time to receive the API key.
- Time for the first 200 OK response.
- Monthly revenue (for monetized APIs).
We use tools like Postman Monitoring, Uptrends, and Amazon CloudWatch (AWS-only) to monitor real-time response time, performance, uptime, availability, and more. Another task is to collect user feedback and incorporate changes into the next iterations of your API.
Set up periodical architecture reviews in addition to Sprint-level tasks. About 10-20% of the Sprint capacity can be set aside to address technical debt, prioritizing security and performance risks.
At one point, you might want to deprecate older versions of the API. Usage analytics (API request logs, user segmentation) are essential for such a decision. If certain endpoints still have heavy traffic, immediate deprecation can alienate important users.
To avoid this, provide deprecation timelines (e.g., 6-12 months) along with a grace period and support for high-value consumers. Another option is to add Deprecation warnings in the response headers for calls made to soon-to-be-removed endpoints.
How to create an API: conclusion
APIs are essential for custom application development. They are a connecting tissue that allows different software components to talk to each other.
You can use these five steps as guidance on how to build an API, one endpoint at a time. Start by defining your requirements. Then, design the API architecture, detail the responses and error messages, build the endpoint, test, and carefully document it.
AI agents are now impossible to ignore as API consumers and a growing security threat. Your API should have machine-readable schemas, predictable patterns across all endpoints, standardized responses, and well-defined, typed errors, as well as documentation with realistic examples and use cases for each endpoint.
If this foundation is messy, no existing or future protocol will magically make your API agent-ready.
And if you need advice or experienced API developers for your project, feel free to contact my team at MindK. We’ve been building complex web and mobile applications for Healthcare, Education, Fintech, and other industries for more than 15 years. We’ll gladly share some of that expertise with a free, no-obligation consultation.