
As promised we are starting a new series devoted to MindK Tech Battles, a monthly meetup for IT professionals organized by our R&D team. And the first showdown is dedicated to mobile development, namely, the pressing debate of React Native vs native iOS/Android development.
Based on insights from our mobile app development team, I’m going to give an overview of both technologies and point out their main benefits and drawbacks from the developers’ point of view.
So, let the battle begin!
What the fuss is all about
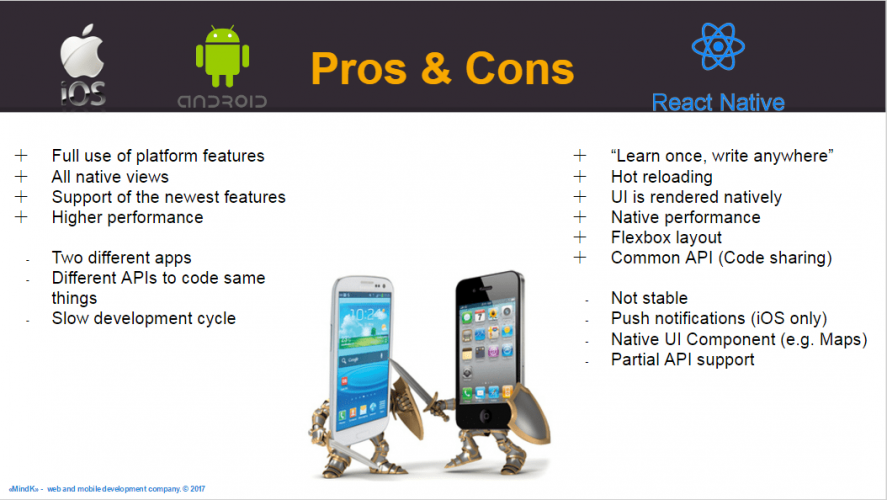
For a long time, Native apps (written in platform-specific languages and using the proprietary tools) were considered the gold standard when it comes to mobile development.
They offer the best performance, trademark look-and-feel, and full access to hardware related features (like support for multi-touch gestures, access to a camera, GPS, calendar, accelerometer and much more).
At the same time, a lot of developers find the promise of cross-platform apps to “write once – deploy everywhere” pretty attractive.
Traditionally HTML5 and Hybrid mobile apps have lagged behind their native counterparts in UI/UX, performance, and features, but the emergence of cross-platform development tech has made it possible for web developers to create fully native apps.
Our R&D team has set out to compare React Native with the best practices of the Native development.
Two ecosystems
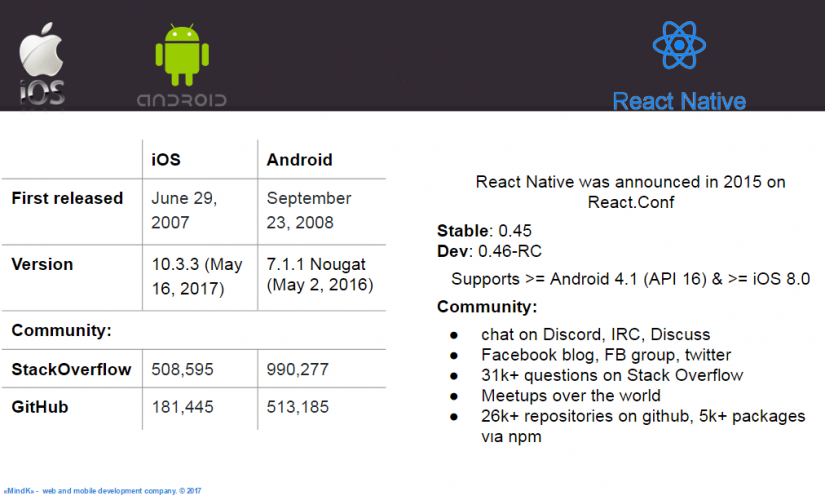
React Native is a JavaScript framework for the development of cross-platform native apps originating at Facebook’s internal hackathon in the summer of 2013. The public caught the first glimpse of React Native at React.js Conf in January 2015. Since then the tech has gone open source and became increasingly popular.
Despite being younger and less widespread, React Native has its own blog and a growing community on GitHub, StackOverflow, Facebook and Twitter. You can also meet other React Native developers in various chats and forums like Reactiflux, Hashnode’s React community, Reddit, IRC channels, etc. Also there are more than 270 React Native meetups all over the world.
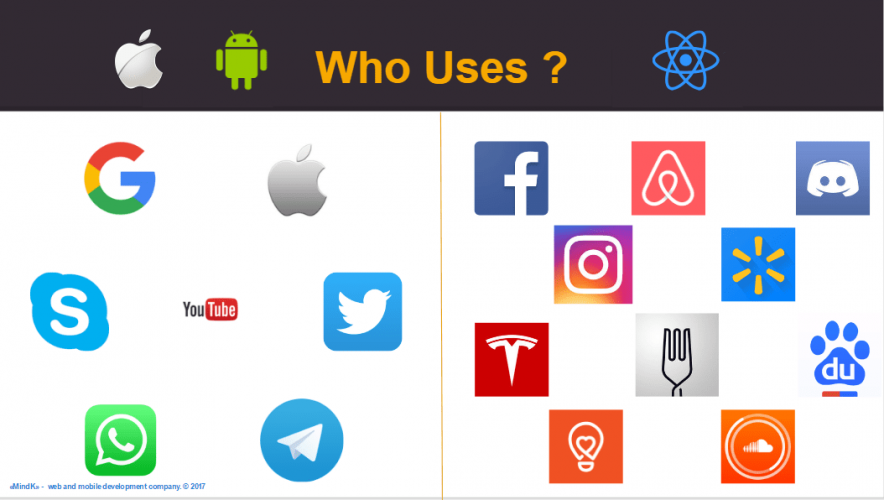
Despite the advent of cross-platform tech the majority of companies still favor Native apps. In addition to the great library of products made by Apple and Google, such notable apps as Twitter and Telegram are developed natively.
Truth be told, some of them are adopting React Native already, though the Skype app was developed natively, it’s new version is written with React Native.
A growing number of companies is using React Native to develop their apps with the likes of Facebook, Instagram, Tesla, Airbnb and Walmart paving the way.
Development process under the magnifying glass
Differences in structure
React Native is based on the ReactJS library. In React you build your UI with components. Each component controls its own state. The composition of these components eventually becomes your UI.
The UI elements in the code and their styling are platform-agnostic but they are rendered as native views. This enables you to reuse a great portion of your code and at the same time create a UI that meets Android/iOS guidelines for style and follows the best practices for each platform.
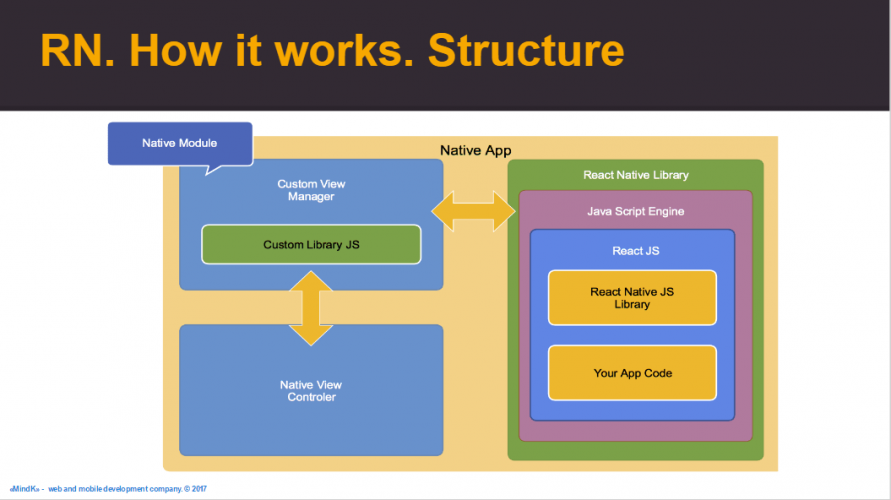
React Native uses JavaScript API over Native components. While creating an app you write a JavaScript code that communicates with native components of an OS. React Native uses the same standard fundamental UI blocks as the Native apps without the need for a browser or WebView/UIWebView.
React Native apps utilize a separate thread to run JavaScript on the device/simulator. This thread interacts asynchronously with the native code. It’s worth mentioning that the native components for different OS (including the UI elements) are also distinct.
Therefore, for each OS it is necessary to create their own ‘bridges’ between the JavaScript code and these components. Facebook provides some of the components, while you can find a great number of community-created ones freely available on the Internet.
As the result the user experience in React Native apps is close to that of native apps and performance is better than in most HTML5 and Hybrid mobile apps.
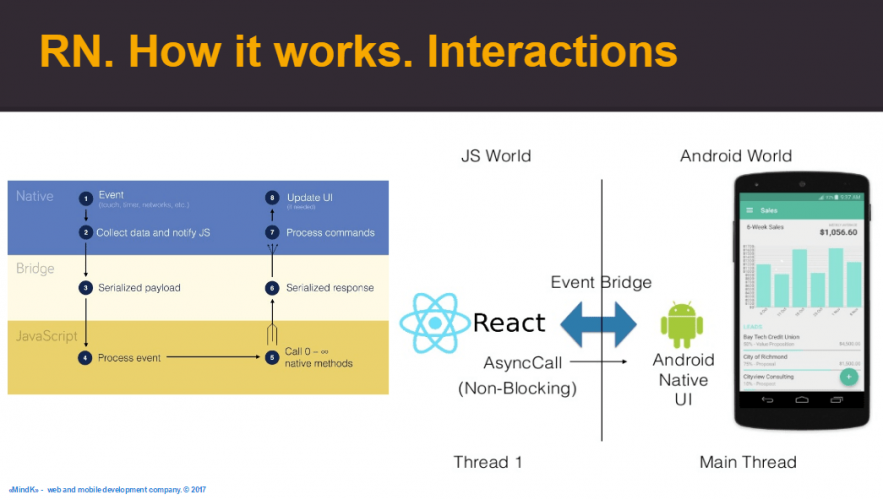
At the heart of a React Native app lies JavaScript, where API calls are made, touch events are processed, and so on. The JS code is executed in parallel with the native code. They are connected with an asynchronous bridge.
A separate Virtual Machine is used to execute the JavaScript code which handles the Native UI elements by means of a bridge. At the end of every event loop iteration, before the frame deadline, the updates to native-backed views are passed in batches over the bridge. The reason for batching is to avoid the overhead that would happen with separate calls.
In React Native, the JavaScriptCore environment is utilized both for iOS-targeted apps where it’s incorporated into the platform itself and for Android where it’s necessary to bundle it with your app.
UI Layouts
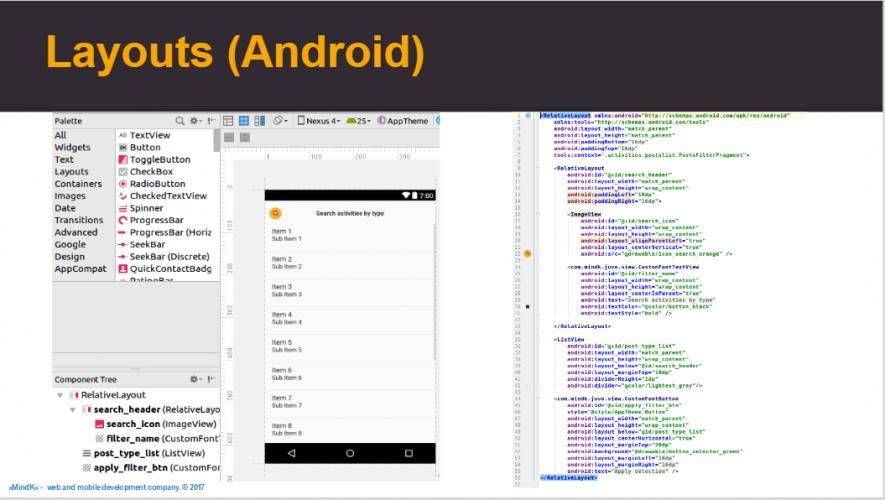
In Android, the layout is realized in XML-format, where you can declare all the UI elements, their properties, and position in relation to each other. Additionally, there is a graphics builder in Android Studio. It allows you to view the ready layout in various screen resolutions as well as add new UI elements and change their properties.
It is more common to edit the layout in XML because you can simultaneously set up the relations between the elements and be sure that all of them will be correctly displayed on all the screens. At the same time, the graphics editor is useful for previewing the layout on various screen sizes.
In iOS, it is preferable to use Interface Builder. It conveniently allows you to align the UI elements and set up the constraints between them. When you add new elements they are given a unique ID. That’s why it is both impossible and inconvenient to only edit XML-files (as you can do in Android).
You can also use Interface Builder to set up the constraints between the UI elements and variables in the code.

You will find neither pixels nor classes in React Native. The layout is implemented via absolute values based on Flexbox. You can use CSS-esque stylesheets to define border widths and margins as well as fonts and colors. The usage of flex-like markup is a significant benefit of the tech as it allows you to change the components size depending on the size of the container.
With “flex: 1” style the component will take up all the available space. If there are more than one component they will spread evenly across the available space. This minimizes the time spent on styling as this approach allows you to display the elements proportionally to the screen resolution. The result is always the same on phones and tablets alike.
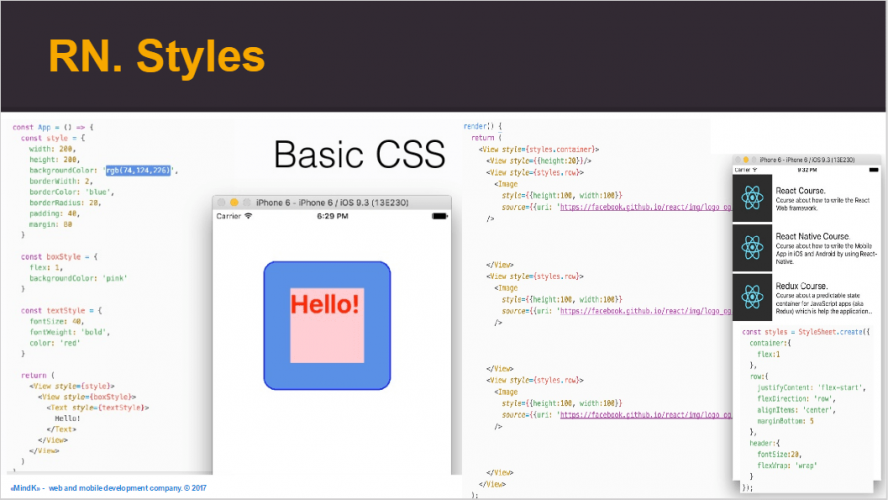
The creation of styles in React Native is slightly different from what is usual for a frontend developer. In React Native, you use a CSS-like syntax written as a JS object. Then the object with ‘styles’ is transformed into platform-specific instructions on the position and color of elements.
In React Native apps the styles are almost always valid for both platforms. In some cases, you can use platform selectors to define the styles.
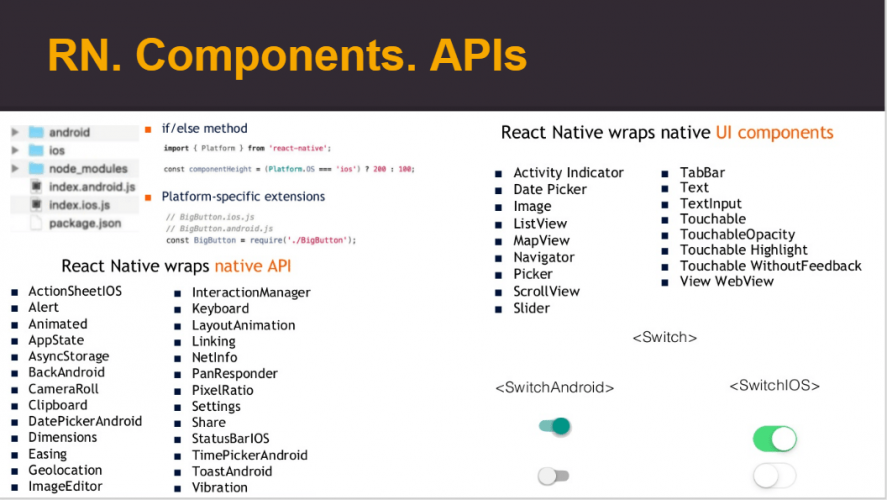
Due to React Native’s ability to detect the platform in your code, you can create various components that have alike functionality but at the same time are adapted to a particular OS. Therefore, you can reuse your JS files for versions targeting both platforms while adding conditionals from time to time. For instance, only iOS supports the ‘overflow’ style property. Likewise, the properties of components can be specific to either platform.
React Native Components
Both iOS and Android have huge SDK containing thousands of modules. The React Native development team made a rational choice not to export all of them into JS environment.
React Native manages native views with JS code. At runtime, its “View” is a native “View” in Android and “UIView” in iOS.
The people behind React Native strive to introduce native widgets to the framework. Some elements aren’t available to Android. Among the examples are UIPicker (which became PickerIOS) or Android’s drawer (which became DrawerLayoutAndroid).
Sometimes the desired functionality is absent from React Native, can’t be created with the components you have at hand or calls for the usage of a library created exclusively for native development.
This is where native modules come into play.
They provide a means for bridging native and React Native code. With their help, you can integrate a native code component with the typical React Native layout.
In the native app, React Native appears as a plain view controller, so if you need to use another view controller provided by a library just push it over React Native and afterward pop back from it.
Debug
Native
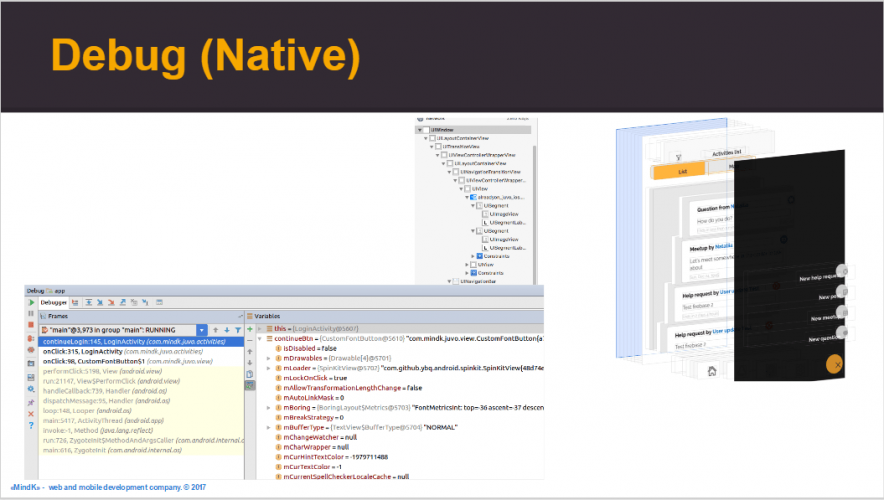
Debug in Android Studio is familiar and convenient. You can place a breakpoint anywhere in the code. While running the app you can view the current call stacks and values of variables and fields (including the private fields).
The same is available in XCode. You can also pause the app at any moment and view the current hierarchy of elements on the screen. This allows you to track the errors related to incorrect displaying of elements.
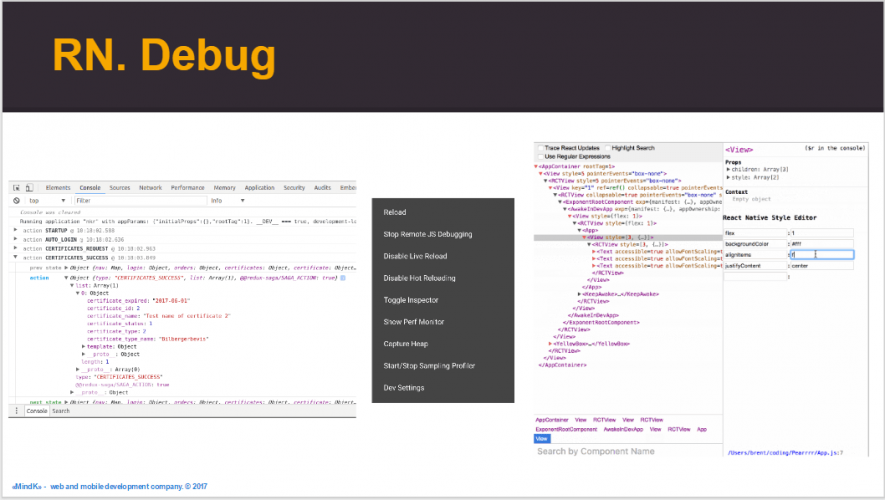
React Native
To debug an React Native app you can use Chrome Developer Tool or Safari web inspector for iOS device/simulator.
To inspect the view elements you can select the “Show inspector” option in the Developer Menu of the device/simulator. You’ll only be able to inspect the styles of elements but not change them.
Also in Developer Menu, there is the Network tab which allows you to track HTTP requests and inspect the request’s type, method, URL, etc.
Another option is React Developer Tools, which allows you to both inspect and alter the hierarchy of React components along with component props and state.
You can also use a platform’s IDE (Android Studio/XCode) for debugging. They allow you to examine in depth all the logs and gauge the app’s performance (resource intensity, speed, etc.).
Compare that to the usual practice of native development where you lose your precious time waiting while your app is rebuilt. Although in case of global changes to the code (config changes, new package installation, etc.), it’s still advisable to re-build the project.
Deployment
Native
To publish a Native app you have to build an application file (apk for Android and ipa for iOS) in IDE and add to Google Play/iTunes. You can also use Gradle plugins to automatically publish the app updates.

React Native
Deployment of React Native apps is very familiar for people used to developing native apps.
To prepare a deployable bundle you’ll have to switch to bundled JavaScript rather than live-reload the deployment version. Once this is done, the bundling procedure is identical to that of a native app. You can then upload the created bundle to Google Play and App Store.
Note, that there is an auto-update option for iOS apps if these updates are exclusively in JavaScript which allows you to avoid the frustrations associated with deployment. Microsoft’s CodePush SDK is another good news as it gives you an option to push your updates directly to user devices.
Wrapping up
We’ve proven in our research that there is no definite winner the React Native vs native debate. Cross-platform has its advantages over native and vice versa.
As a pretty young technology, React Native has some of the issues associated with immature libraries (like missing features or best practices that aren’t defined sufficiently).
A lot of developers point out that the stability of React Native is not up to par with the standards of native development. The library has a rapid release cycle with breaking changes happening from time to time. Yet others consider React Native mature enough so that its pros easily outshine its cons.
The React Native UI is fully native and for the most part, React Native apps provide performance, look, and feel that are equivalent to that of Native apps. Oftentimes, you still need to use native components and you can’t share more than 30% of the code in the case of more complex apps with platform specific UIs, but it is still a huge saving.
QA is also cheaper for React Native. Although the UI elements in React Native are different for iOS/Android, the underlying business logic (and the bugs related to it) are the same for both platforms.
This means that despite having a comparable number of UI-related bugs, your average React Native app would be quicker to test than its Native alternatives. You can also save on unit tests for the shared code.
Of course, each project has its own peculiarities that have to be taken into account when choosing a tech stack.
In case you want to develop your next app for both iOS and Android, and potentially other platforms, don’t forget to consider React Native – it can help you save time and money.
And a native app is great when you consider using all the features that a platform offers, including such modules as video/audio processing or multi-threading. Since React Native focuses on the User Interface only, it can be less efficient for applications with many native features.
And don’t forget to subscribe to get all our articles fresh off the press!